The Story of a Sweet Autumn Day
I first made this pie on a crisp October afternoon. My grandson was helping me rake leaves. We promised ourselves a treat after all that work. I wanted something special, not just plain pumpkin.
I mixed maple syrup from our own trees with cream. The smell filled the whole kitchen. It smelled like a cozy hug. That’s why this matters. Food can turn a regular day into a sweet memory.
Why This Pie is Different
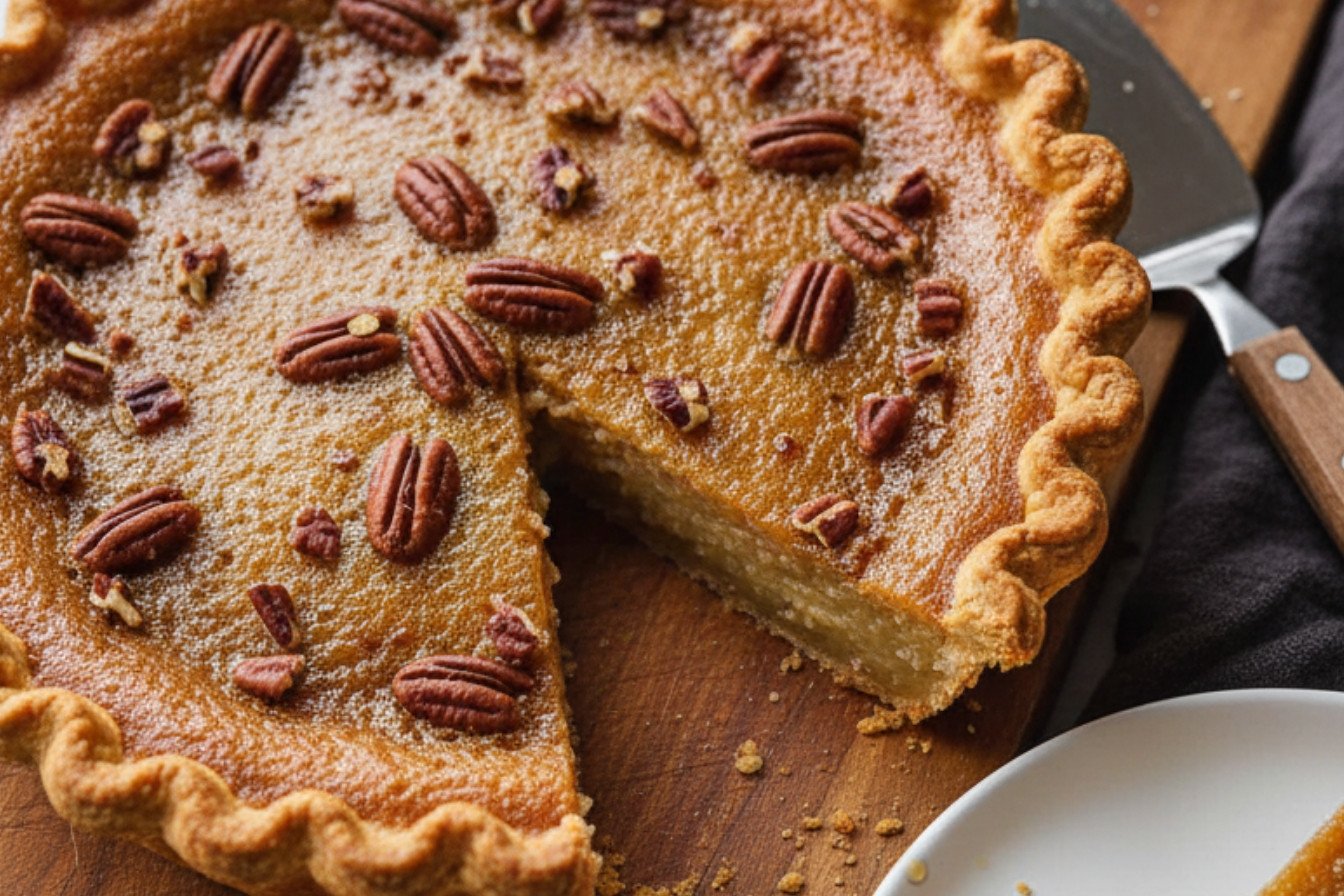
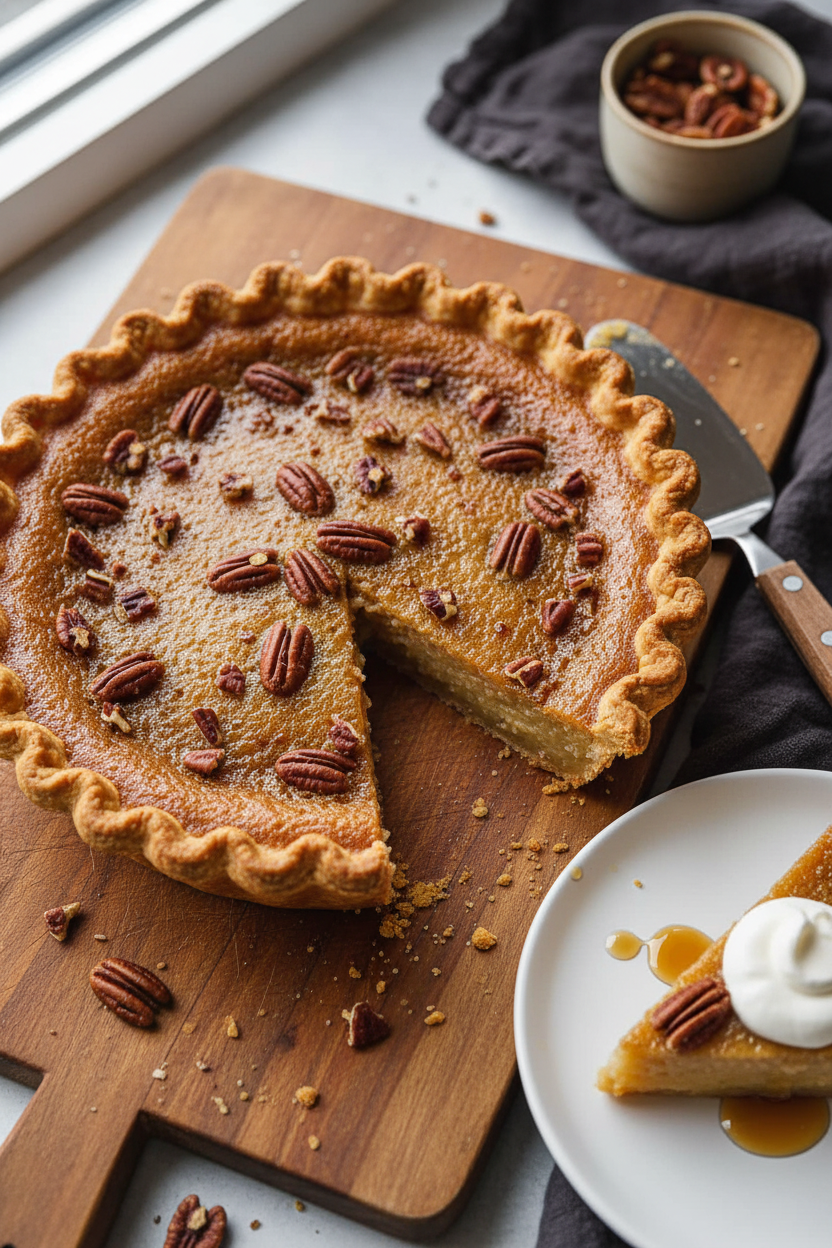
This is not your usual runny pie. The cornstarch and eggs make it set firm. It becomes smooth and sliceable. Think of a creamy caramel that you can eat with a fork.
The cider vinegar is my little secret. It sounds odd, I know. But it balances all that sweetness perfectly. You won’t taste it, I promise. It just makes the flavor sing.
A Little Tip for the Crust
That chilling step is important. A cold crust holds its shape in the oven. I use dried beans as pie weights. I keep a jar of them just for baking.
Don’t rush the cooling. Let the crust get completely cool. A warm crust will make the filling weep. Patience makes a perfect pie. What’s your favorite type of pie crust? Flaky or crumbly?
The Magic of Real Maple
Use the real maple syrup here. The fake stuff just won’t taste right. Real syrup has a deep, woodsy flavor. It makes all the difference.
Fun fact: It takes about 40 gallons of tree sap to make just 1 gallon of maple syrup. That’s why it’s so precious! When you taste this pie, you taste a lot of hard work from the trees.
Let’s Talk About That Filling
Be careful when you boil the syrup and cream. It gets very hot and bubbly. Whisk it gently. I still laugh at that one time I got a sticky splash on my apron.
Letting the mixture cool before adding eggs is key. This matters because you don’t want scrambled eggs in your caramel! You want a silky filling. Doesn’t that smell amazing when it’s cooking?
The Final Wait & A Question For You
The pie must set in the fridge. This is the hardest part! Waiting makes it perfect. It slices cleanly after a few cold hours. Serve it with a dollop of whipped cream.
The toasted pecans add a lovely crunch. I like to sprinkle them on top just before serving. Do you prefer nuts in your pie or on the side? What’s a food memory that always makes you smile? Share it with me.
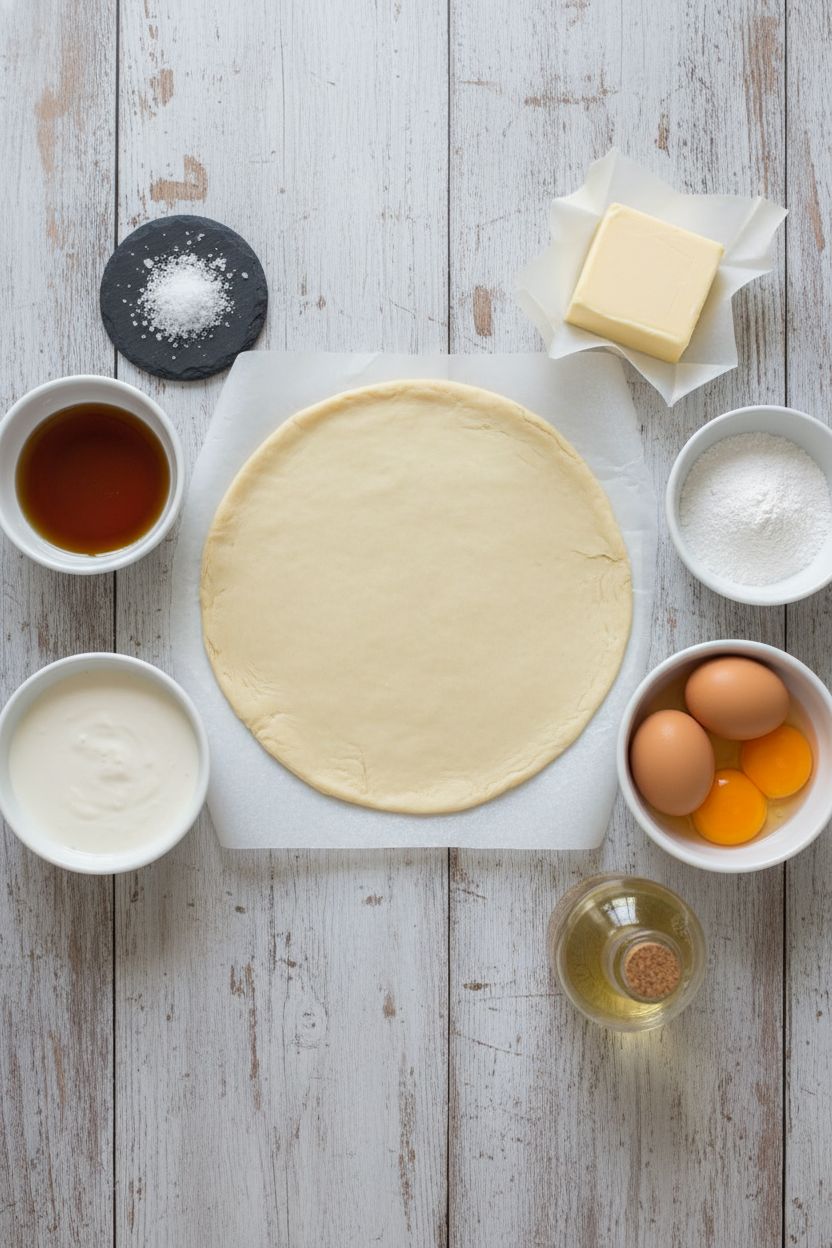
Ingredients:
| Ingredient | Amount | Notes |
|---|---|---|
| Pie dough round | 1 (9-inch) | |
| Pure maple syrup | 1 ¾ cups | |
| Heavy cream | ⅔ cup | |
| Salt | ¼ teaspoon | |
| Unsalted butter | 5 tablespoons | |
| Cornstarch | 2 tablespoons | |
| Large eggs | 3 | |
| Large egg yolks | 2 | |
| Cider vinegar | 2 teaspoons |
Instructions
Step 1: First, get your oven ready. Put a rack in the middle and heat it to 375°F. Lightly grease your pie plate. Roll out your dough on a floured counter. I still laugh at that time I used the floor. Roll it bigger than your plate. Gently lift the dough into the plate. (A little flour on your rolling pin stops sticking!)
Step 2: Now, shape the crust edge. Trim extra dough, leaving a little overhang. Fold that overhang under itself. This makes a thick edge on the rim. Crimp it with your fingers to make it pretty. Pop the whole plate into the freezer for 15 minutes. This keeps the shape while baking.
Step 3: Time to bake the crust blind. Line the cold crust with parchment paper. Fill it with pie weights or dried beans. Bake it until the edges look golden. Remember to turn the plate halfway. Then take out the paper and weights. Bake it a few more minutes until the bottom looks dry. Let it cool completely. What’s your favorite pie crust trick? Share below!
Step 4: Lower your oven to 350°F. Let’s make the filling. In a saucepan, mix maple syrup, cream, and salt. Bring it to a gentle boil. Add the butter and whisk until it melts. Doesn’t that smell amazing? Whisk in the cornstarch next. Let it simmer for one minute, whisking often. Pour it into a big bowl to cool for 30 minutes. (Whisking often stops lumps from forming.)
Step 5: Finish the silky filling. Whisk the eggs, yolks, and vinegar together. Pour this into your cooled maple mixture. Whisk it all until it’s perfectly smooth. Place your cooled crust on a baking sheet. This catches any drips. Pour the filling right into the crust. It will be very liquid, and that’s okay.
Step 6: Bake your pie. Put it on the middle oven rack. Bake until the filling is just set. It should wobble a little in the center. Let it cool on a rack for two hours. Then, the hard part. It must chill in the fridge. Wait at least two hours, or even overnight. This patience makes every slice perfect.
Creative Twists
Salty-Sweet Boost: Sprinkle a little flaky sea salt on top before serving.
Nutty Change-Up: Use toasted walnuts instead of pecans for a deeper flavor.
Breakfast Pie: Add cooked, crumbled bacon on top of the whipped cream. Which one would you try first? Comment below!
Serving & Pairing Ideas
This pie is rich, so a little goes a long way. A dollop of unsweetened whipped cream is perfect. A sprinkle of toasted pecans adds a lovely crunch. For a fancy touch, try a small spoon of crème fraîche. Its tang cuts the sweetness nicely. For drinks, a hot cup of black coffee is my go-to. For a special night, a glass of tawny port wine pairs beautifully. Which would you choose tonight?
Keeping Your Maple Caramel Pie Perfect
This pie loves the cold. Keep it covered in the fridge for up to four days. The filling stays wonderfully set. You can also freeze the whole pie for a month. Just wrap it tightly in plastic first.
I like to make two crusts at once. I bake one now and freeze the other raw. It saves so much time later. This is why batch cooking matters. It gives you a gift for your future, busier self.
My first time, I left the pie on the counter. The filling got a bit too soft. Now I always chill it. Serve slices straight from the fridge for the best texture. Have you ever tried storing it this way? Share below!
Simple Fixes for Common Pie Problems
Is your crust shrinking? Freeze it before baking. This keeps its shape. I remember when my crust shrank into a little saucer. Freezing fixed it completely.
Is the filling not setting? Let it cool fully. Then refrigerate it for two hours. This patience matters. It makes the slice neat and the flavor rich.
Are the edges browning too fast? Use a pie shield or foil. This protects the crimped edges. Fixing small issues builds your cooking confidence. You learn that every problem has a simple answer. Which of these problems have you run into before?
Your Quick Questions, Answered
Q: Can I make this gluten-free? A: Yes! Use your favorite gluten-free pie dough. It works just fine.
Q: Can I make it ahead? A: Absolutely. Bake it the day before. The flavors get even better overnight.
Q: What if I don’t have cider vinegar? A: Use white vinegar or lemon juice. Both add the needed little tang.
Q: Can I make smaller pies? A: You can use small tart pans. Just reduce the baking time by about ten minutes.
Q: Is the whipped cream necessary? A: No, but it’s lovely. A little cream cuts the sweetness perfectly. *Fun fact: It takes about 40 gallons of maple sap to make one gallon of syrup!* Which tip will you try first?
From My Kitchen to Yours
I hope you love making this pie. It is a special treat for happy days. The smell of maple in your kitchen is pure joy.
I would love to hear about your baking adventure. Tell me how it went for you. Have you tried this recipe? Please share your story in the comments below.
Happy cooking!
—Fiona Brooks.
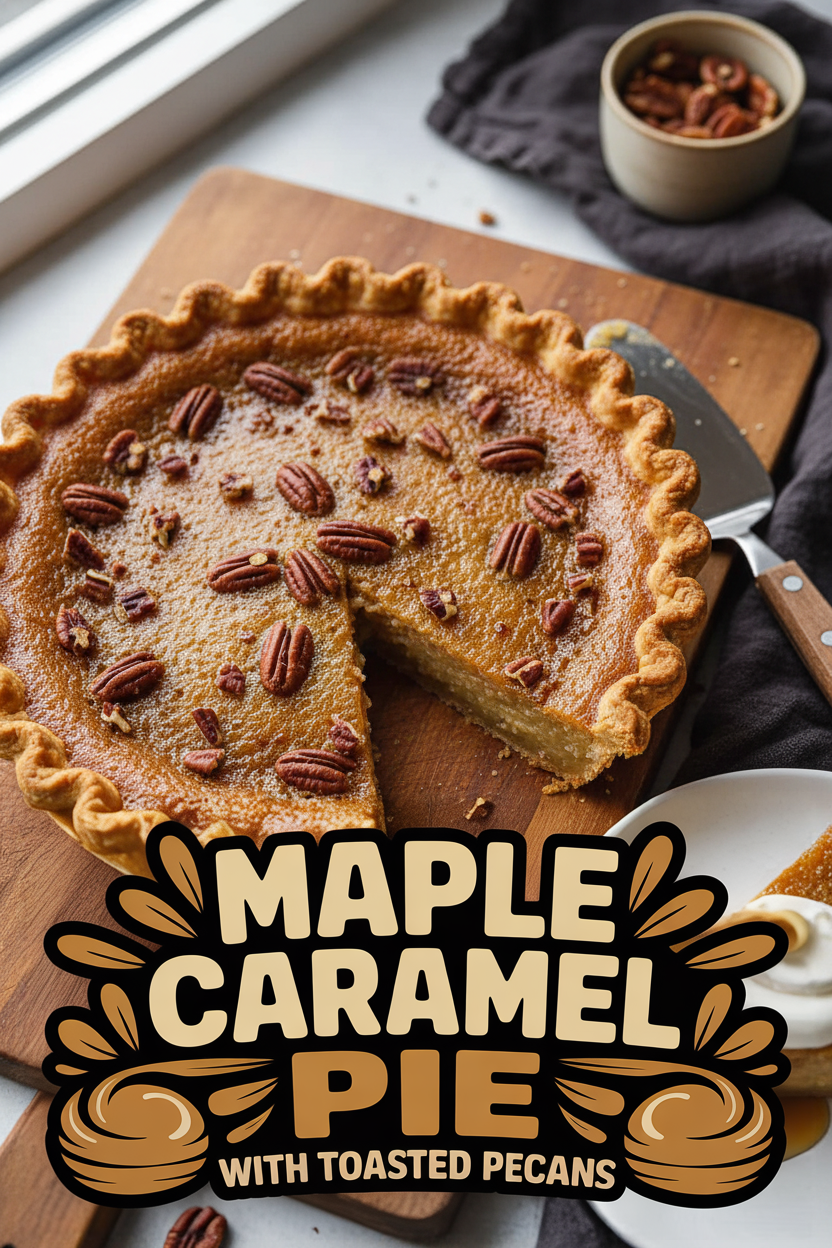
Maple Caramel Pie with Toasted Pecans
Description
A rich and decadent pie featuring a smooth maple caramel filling in a flaky crust, topped with toasted pecans.
Ingredients
Instructions
- Position an oven rack in the center of your oven and preheat to 375°F (190°C). Lightly grease a 9-inch pie plate.
- On a floured surface, roll the pie dough into a 12-inch circle. Carefully transfer it to the prepared pie plate. Gently press the dough into the plate, leaving the overhang.
- Trim the excess dough to leave a 1/2-inch overhang. Fold this overhang under itself so the folded edge sits on the rim of the pie plate. Crimp the edges decoratively.
- Freeze the shaped crust until firm, about 15 minutes.
- Line the chilled crust with parchment paper or foil and fill with pie weights. Bake on the middle rack until the edges are lightly golden, 18 to 25 minutes, rotating the plate halfway through.
- Remove the parchment and weights. Continue baking until the bottom looks opaque and dry, 3 to 6 minutes more. Let the crust cool completely, at least 30 minutes.
- Lower the oven temperature to 350°F (175°C).
- In a medium saucepan, combine the maple syrup, cream, and salt. Bring to a boil. Add the butter and whisk until melted.
- Whisk in the cornstarch. Reduce the heat to medium-low and simmer for 1 minute, whisking often. Pour the mixture into a large bowl and let it cool for at least 30 minutes.
- Whisk the eggs, egg yolks, and cider vinegar into the cooled maple mixture until completely smooth.
- Place the cooled pie crust on a rimmed baking sheet. Pour the filling into the crust.
- Bake on the middle rack until the filling is just set, 35 to 45 minutes.
- Let the pie cool completely on a wire rack, about 2 hours. Then, refrigerate it until fully set, at least 2 hours or overnight.
Notes
- Serve chilled or at room temperature, optionally topped with unsweetened whipped cream or crème fraîche.


Leave a Reply