The Apple Secret
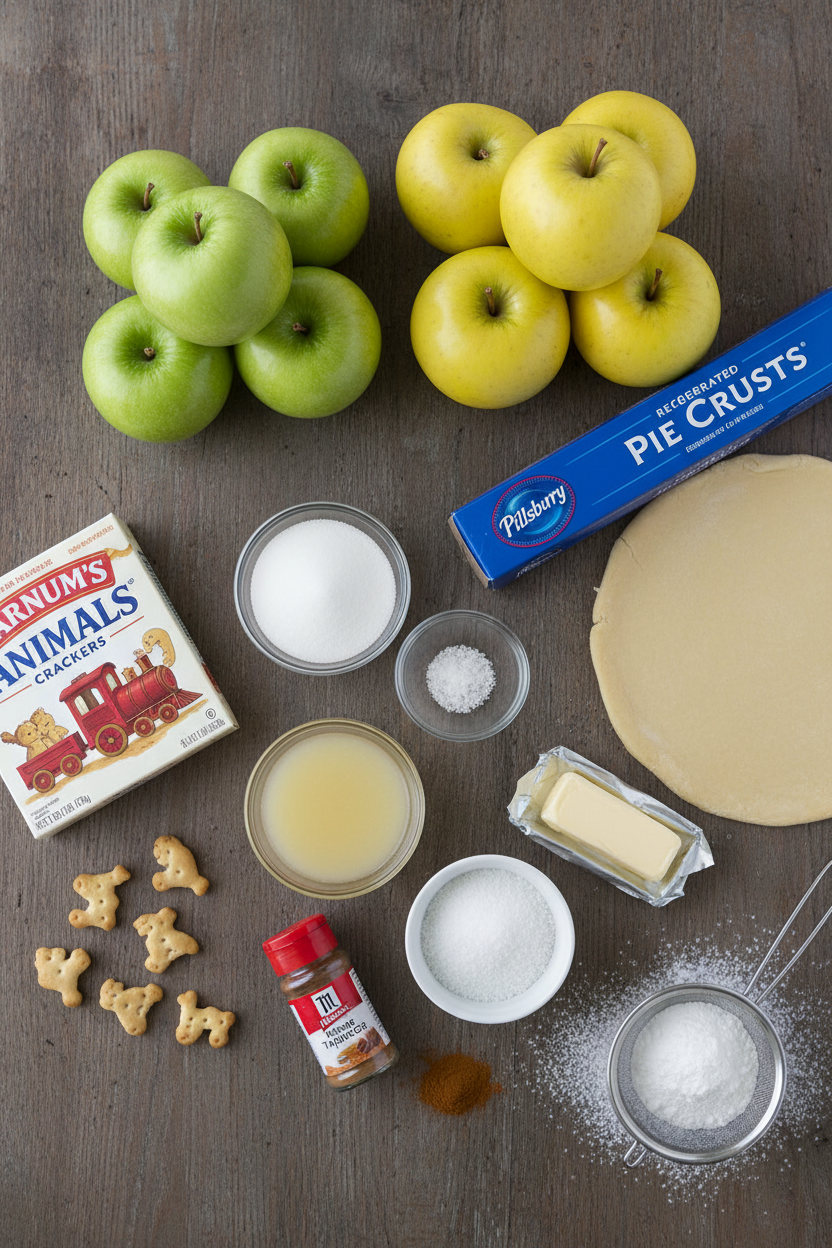
Let me tell you about the apples. You need two kinds. Granny Smith and Golden Delicious. The tart and the sweet. They dance together in the pie. This matters because life is better with a little balance, don’t you think?
We start by letting them sit with sugar. This pulls out their sweet juice. We save that juice. It becomes magic later. Doesn’t that smell amazing already? What’s your favorite apple for baking? I’d love to know.
A Crust with a Crunch
Now, the crust is a fun trick. We use animal crackers! You crush them up with sugar. It makes the crust sweet and sandy. I still laugh at that. My grandson thought we were making a zoo pie.
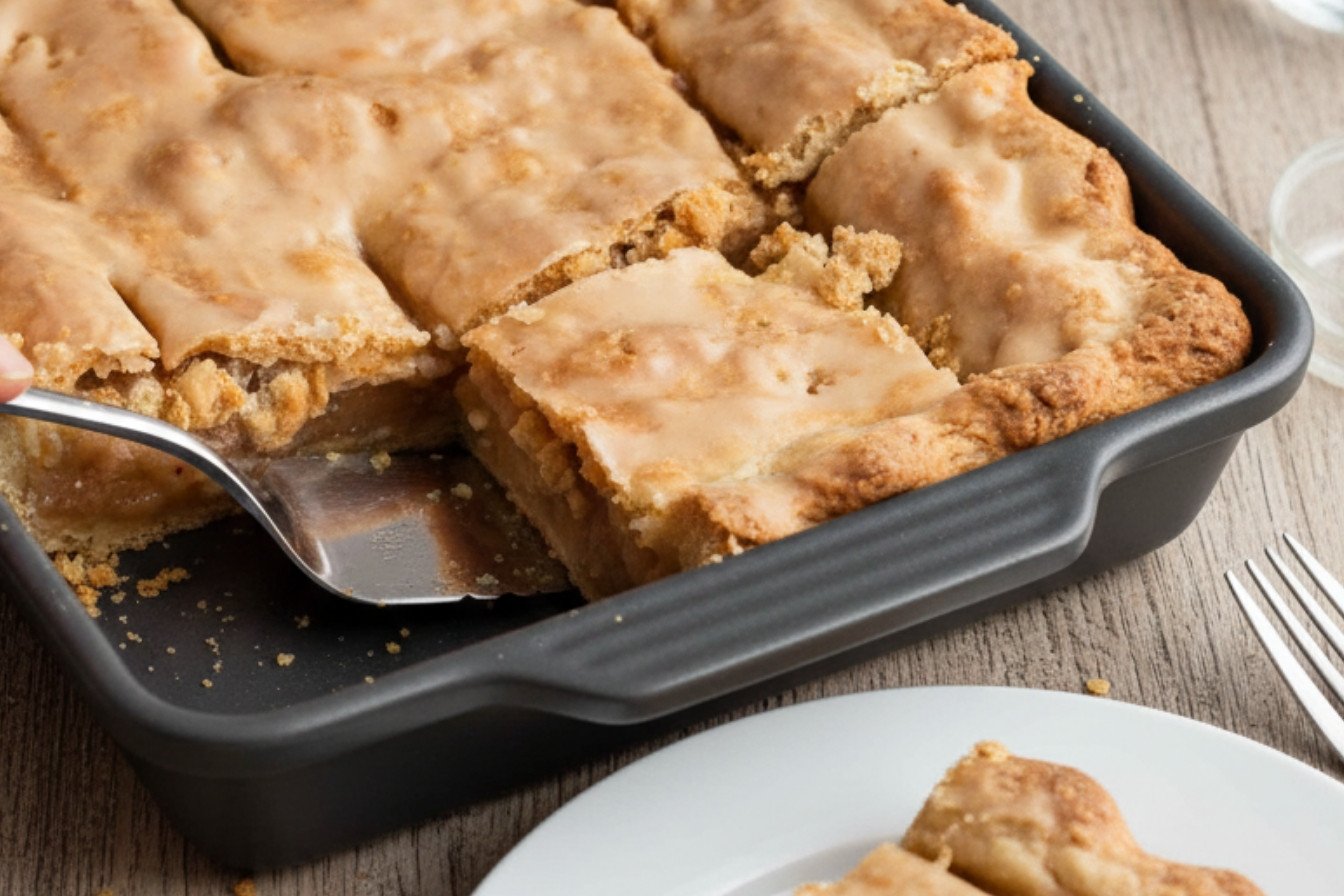
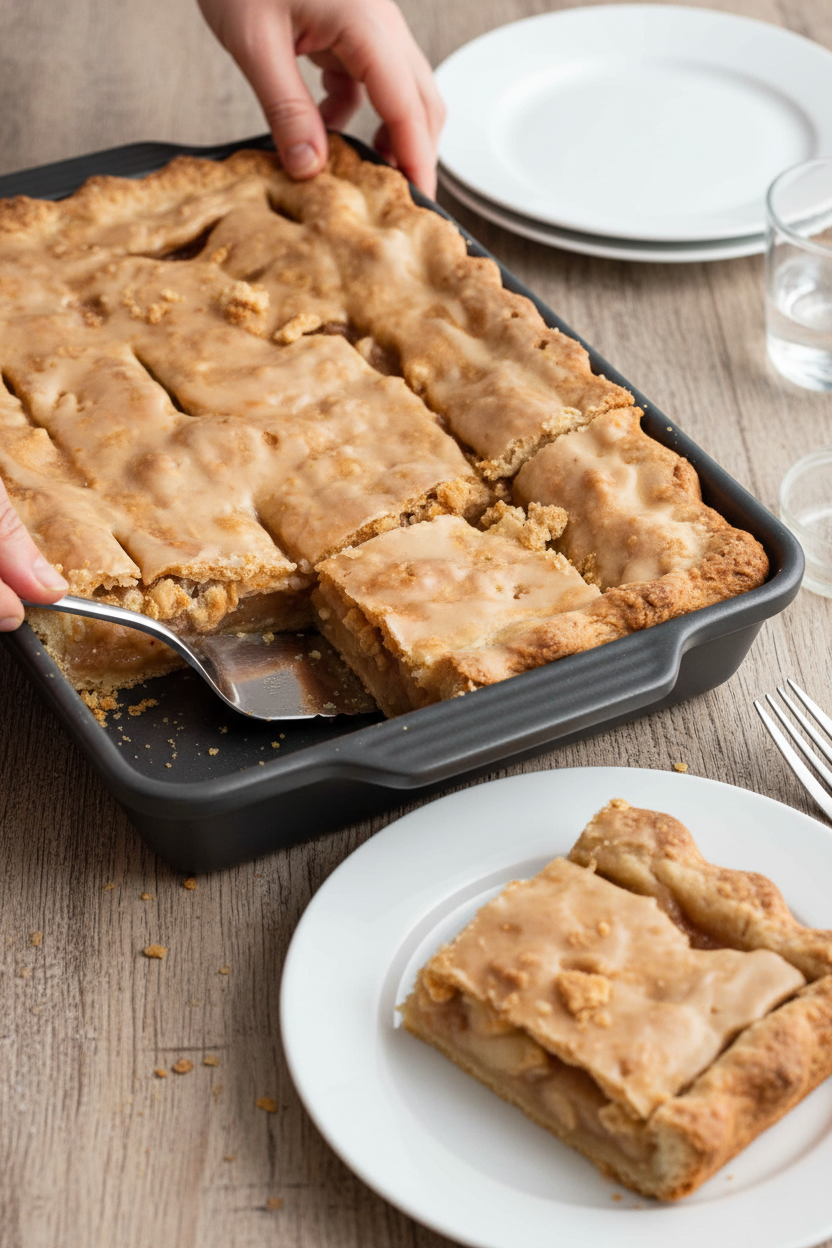
You roll the dough out big on a baking sheet. This is a slab pie. It feeds a crowd. *Fun fact: slab pies became popular for church socials and big family reunions.* Everyone gets a square. It’s simple and shareable.
Putting It All Together
Drain those happy apples. Mix them with cinnamon and tapioca. Tapioca thickens the juice so it’s not runny. Spread the filling over the bottom crust. It’s a big, beautiful mess.
Then you put the top crust on. Seal the edges with a fork. Poke holes so the pie can breathe. This matters. It lets the steam out so your crust stays crisp. Do you like crimping the edges? It’s my favorite part.
The Magic Glaze
Remember that apple juice we saved? Here’s the magic. You cook it down until it’s syrupy. It gets so shiny and rich. Then you make a simple glaze with powdered sugar.
Brush it on the warm pie. It soaks in and makes everything sparkle. It turns a simple pie into something special. Using what you have is a good lesson, in baking and in life.
Sharing the Slab
Let the pie cool completely. I know, waiting is hard! But it helps the filling set. Then you cut it into squares. Perfect for a lunchbox or a picnic.
You can make it a day ahead, too. That’s my kind of recipe. Less stress when friends come over. Tell me, what’s your go-to dessert for sharing? A cake, cookies, or maybe a pie like this?
Ingredients:
| Ingredient | Amount | Notes |
|---|---|---|
| Granny Smith apples | 8 (about 3½ pounds) | Peeled, cored, and sliced thin |
| Golden Delicious apples | 8 (about 3½ pounds) | Peeled, cored, and sliced thin |
| Granulated sugar | 1 ½ cups (10½ ounces/298 grams) | Divided use |
| Salt | ½ teaspoon | |
| Animal crackers | 1 ½ cups | |
| Ready to Roll Pie Crust | 2 (15-ounce) boxes | |
| Unsalted butter, melted | 4 tablespoons | Cooled |
| Minute Tapioca | 6 tablespoons | |
| Ground cinnamon | 2 teaspoons | |
| Lemon juice | 3 tablespoons | For the pie filling |
| Reserved apple juice | ¾ cup | From draining the apples |
| Lemon juice | 2 tablespoons | For the glaze |
| Unsalted butter, softened | 1 tablespoon | For the glaze |
| Confectioners’ sugar | 1 ¼ cups (5 ounces/142 grams) |
My Favorite Apple Slab Pie
Hello, my dear! Let’s make my famous apple slab pie. It’s perfect for a big family gathering. I learned this recipe from my own grandma, you know. We’d make it every fall when the apples were ripe. Doesn’t that smell amazing?
Instructions
Step 1: First, let’s prepare those lovely apples. Put your sliced apples in a big colander over a bowl. Toss them with one cup of the sugar and the salt. Let them sit for half an hour, tossing now and then. The apples will release their sweet juice. (A hard-learned tip: press the apples gently to get all that liquid!)
Step 2: Now, we make our special crust. Pulse the animal crackers and leftover sugar in a food processor. It makes fine, sweet crumbs. Stack two pie dough rounds, brushing one with water first. Roll them out into a big rectangle on a cracker-dusted counter. I still laugh at how messy this can get!
Step 3: Place your bottom crust on a baking sheet and brush it with butter. Chill it. Mix your drained apples with tapioca, cinnamon, and lemon juice. Spread this filling evenly over the cold crust. Do you think we should add a pinch of nutmeg? Share below!
Step 4: Drape the top crust over the apples. Press and seal the edges with a fork. Use that fork to poke pretty vents all over the top. This lets the steam out while baking. Bake for about an hour until it’s golden and bubbly. Your kitchen will smell like heaven.
Creative Twists
Berry Bliss: Swap half the apples for frozen mixed berries. It adds a lovely color.
Crunchy Top: Sprinkle coarse sugar on the crust before baking. It gives a sweet, sparkly crunch.
Cheesy Surprise: Add a thin layer of sharp cheddar under the apples. Trust me, it’s wonderful.
Which one would you try first? Comment below!
Serving & Pairing Ideas
This pie is wonderful all on its own. For a treat, add a scoop of vanilla ice cream. A dollop of fresh whipped cream is lovely, too. Pour a cold glass of spiced apple cider for everyone. For the grown-ups, a small glass of sweet Riesling wine pairs beautifully. Which would you choose tonight?
Keeping Your Slab Pie Perfect
Let’s talk about keeping your pie lovely. Once cool, cover it right on the pan. Use foil or plastic wrap. It stays fresh on the counter for two days. For longer, slide the whole pan into the fridge. It will keep for four days there.
You can freeze slices, too. Wrap each piece tightly. I use foil first, then a freezer bag. My first time, I just used a plate. The crust got soggy! A good seal keeps it tasty.
To reheat, warm slices in a 300-degree oven. Do this for about 15 minutes. This brings back the crispy crust. Batch cooking matters for busy families. A ready-made dessert saves the day. Have you ever tried storing it this way? Share below!
Simple Fixes for Common Slab Pie Problems
Sometimes our baking has little hiccups. Here are three common ones. First, a soggy bottom crust. Always chill your dough on the sheet pan. This helps so much.
Second, the filling is too runny. Draining the apples is the key step. I remember when I skipped this once. We had apple soup in a crust! Draining gives you control.
Third, the crust cracks when you roll it. Just pinch it back together. The dough is very forgiving. Fixing small issues builds your kitchen confidence. It also makes the flavors just right. Which of these problems have you run into before?
Your Quick Questions, Answered
Q: Can I make this gluten-free? A: Yes! Use a gluten-free pie crust. Use gluten-free crackers for the crumbs too.
Q: How far ahead can I make it? A: You can bake it one full day ahead. Store it in the fridge like we discussed.
Q: What if I don’t have tapioca? A: Cornstarch works in a pinch. Use 3 tablespoons instead of the 6 of tapioca.
Q: Can I make a smaller pie? A: Absolutely. Just use one box of crust and half the filling. Use a smaller baking sheet.
Q: Any optional tips? A: A pinch of nutmeg in the filling is nice. Fun fact: This was my own grandma’s secret. Which tip will you try first?
A Final Word From My Kitchen to Yours
I hope you love making this slab pie. It is meant for sharing with loved ones. The process is part of the joy. Please tell me all about your baking adventure.
I read every comment with my morning tea. Your stories make my day brighter. Have you tried this recipe? Let me know how it turned out for you.
Happy cooking!
—Fiona Brooks.
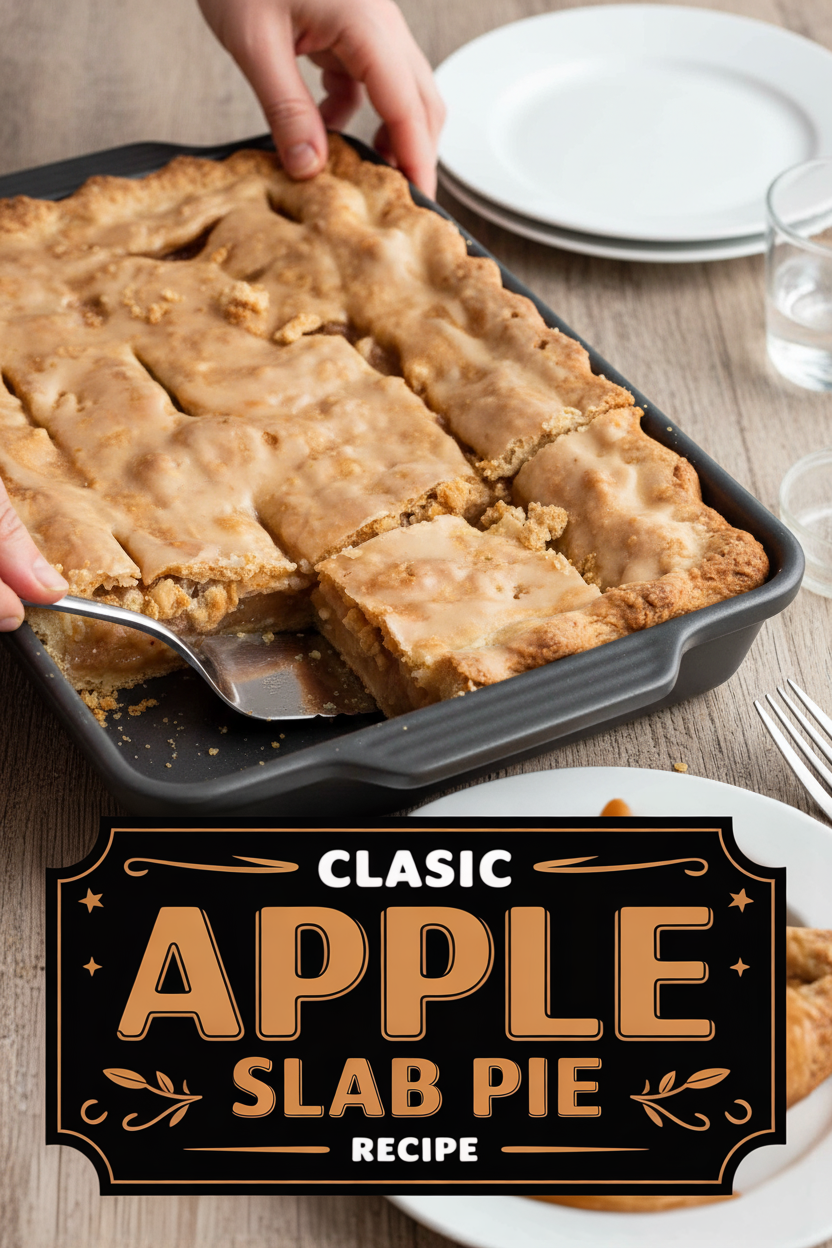
Classic Apple Slab Pie Recipe
Description
A classic, crowd-pleasing apple slab pie with a flaky crust, sweet-tart filling, and a glossy apple juice glaze.
Ingredients
Instructions
- Begin by placing the sliced apples in a colander set over a large bowl. Toss them with 1 cup of the granulated sugar and the salt. Allow this to rest for about 30 minutes, tossing now and then, so the apples can release their liquid. Gently press the apples to extract the juice, and set aside ¾ cup of this liquid for the glaze.
- Move your oven rack to the lower-middle position and preheat the oven to 350°F. In a food processor, pulse the animal crackers with the remaining granulated sugar until they form fine crumbs. Sprinkle some of this mixture on your work surface. Brush one pie round lightly with water, then place a second round over it, overlapping slightly. Dust the top with more of the cracker mixture. Roll the stacked dough out into a 19×14-inch rectangle and carefully transfer it to a rimmed baking sheet. Brush the surface with some of the melted butter and refrigerate. Repeat this process to prepare the top crust.
- Combine the drained apples with the tapioca, cinnamon, and lemon juice. Spread this filling evenly over the chilled bottom crust, pressing down lightly. Moisten the edges of the bottom crust with water, then drape the top crust over the filling. Press the crusts together and trim any overhanging dough. Crimp and seal the edges with a fork, then use the fork to poke vents across the top crust at 2-inch intervals. Bake for about 1 hour, until the crust is golden and the filling is bubbling. Transfer the pie to a wire rack and let it cool for 1 hour.
- While the pie cools, prepare the glaze. In a saucepan, simmer the reserved ¾ cup of apple juice over medium heat until it thickens into a syrup and reduces to about ¼ cup, roughly 6 minutes. Remove from heat and stir in the lemon juice and butter, allowing it to cool to room temperature. Whisk in the confectioners’ sugar until smooth. Brush this glaze evenly over the still-warm pie. Allow the pie to cool completely, for at least another hour, before serving.
Notes
- The finished pie can be prepared up to one day ahead and stored in the refrigerator. Bring it to room temperature before serving.


Leave a Reply