
My First Icebox Cookie Disaster
Let me tell you about my first time. I was so excited. I didn’t chill the dough long enough.
The logs were soft. My slices looked like little blobs. I still laugh at that. Chilling matters. It gives the cookie its shape.
Why We Cream the Butter
This step is my favorite. You beat the butter and sugar. It turns pale and fluffy.
Doesn’t that smell amazing? This isn’t just mixing. It traps tiny air bubbles. Those bubbles make your cookie tender. *Fun fact*: This is why your cookies don’t feel like bricks!
The Magic of the Log
You shape the dough into logs. Then you wrap them up tight. The fridge is their naptime.
You can bake now or in three days. This is the “icebox” part. It means you can have fresh cookies anytime. What’s your favorite make-ahead treat? Tell me in the comments.
Rolling in Joy
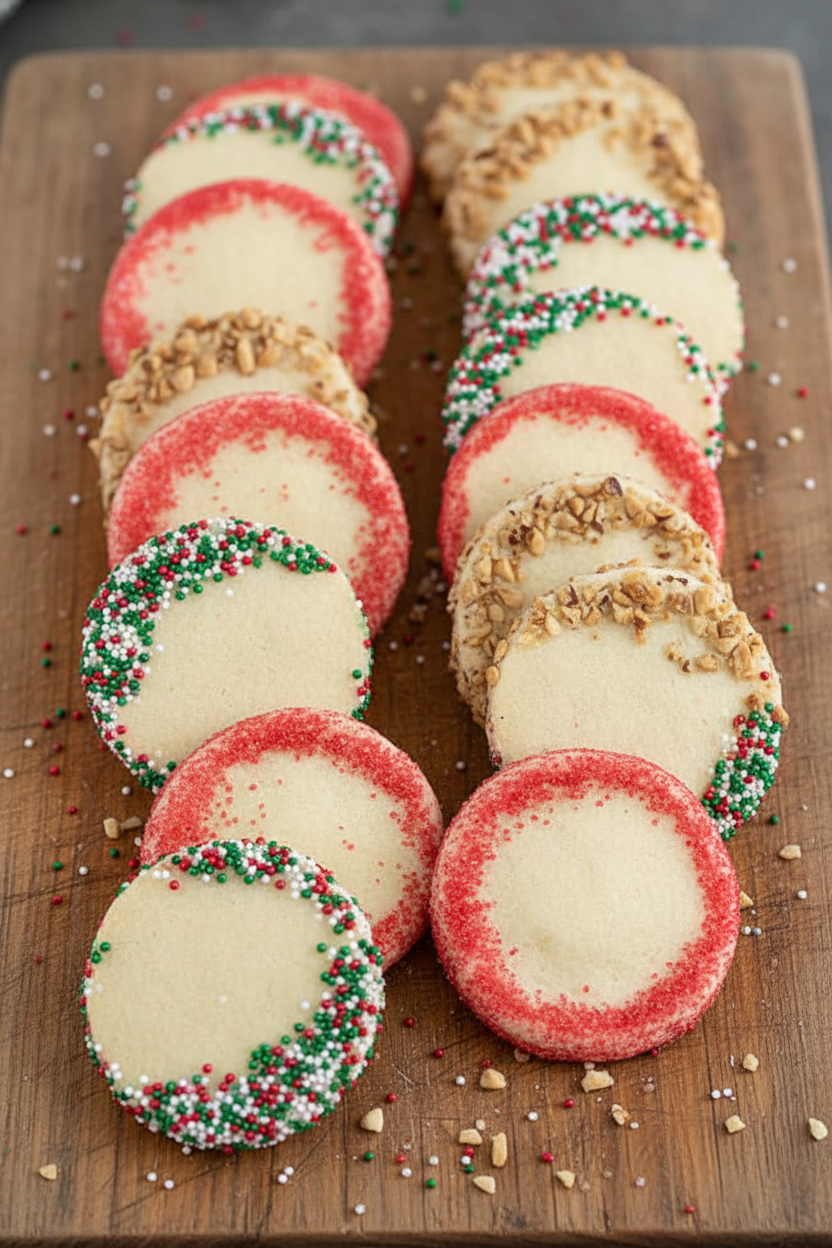
Now for the fun. Roll that cold log in sprinkles. Or use chopped nuts. The colors make me smile.
This is where you make them yours. The outside gets a sweet, crunchy jacket. Would you pick rainbow sprinkles or toasted nuts? I love hearing your choices.
Slice and Bake Love
Use a sharp knife. Slice them about a quarter-inch thick. See the perfect round shape? That’s the chilled dough working.
Space them out on the sheet. They need room to breathe. Watch the edges turn a light gold. That’s when you know they’re done.
Why This Recipe is a Keeper
These cookies are simple. But they teach you patience. Good things come from waiting.
They also teach sharing. You make the logs ahead. Then you bake just what you need. Fresh cookies for a friend’s visit? Yes, please. What memory would you make with these cookies?
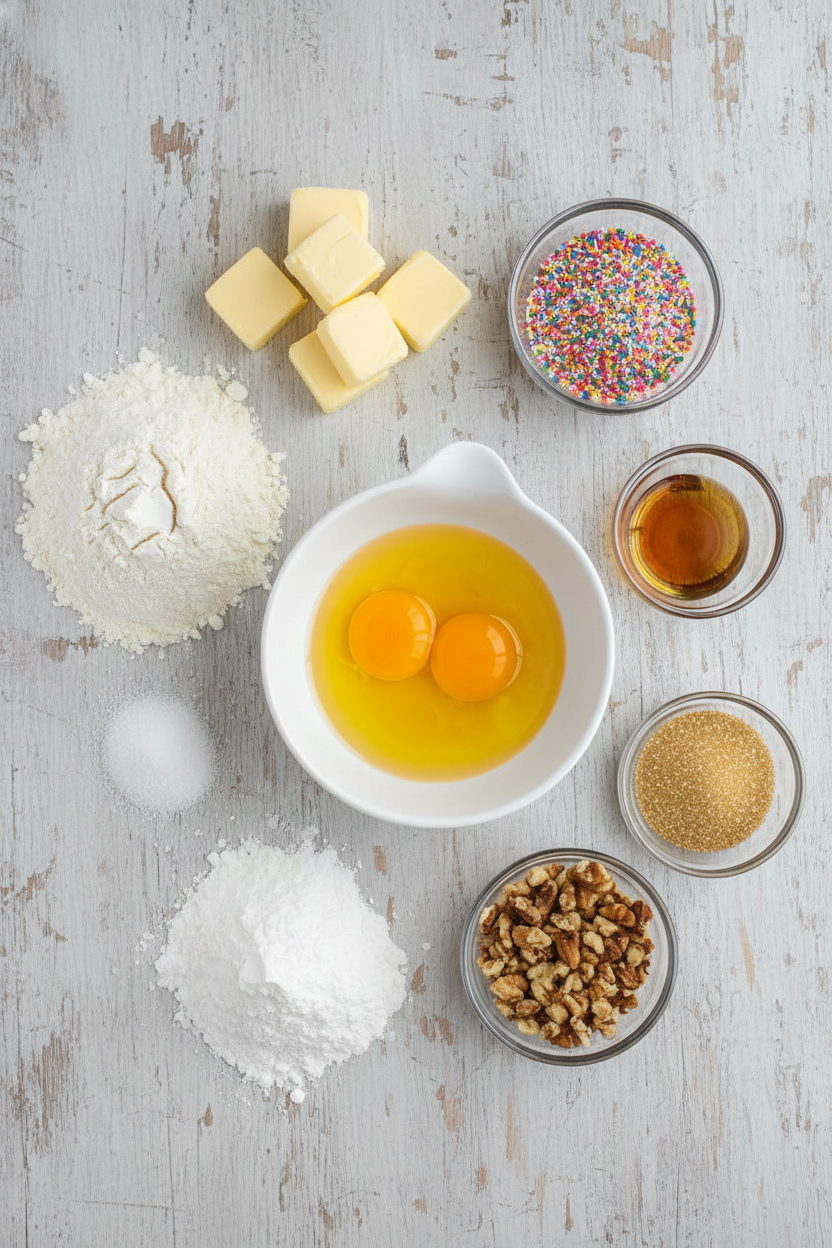
Ingredients:
| Ingredient | Amount | Notes |
|---|---|---|
| All-purpose flour | 2 ¼ cups (11 ¼ ounces/319 grams) | |
| Salt | ½ teaspoon | |
| Unsalted butter, softened | 16 tablespoons | 2 sticks / 1 cup |
| Granulated sugar | ¾ cup (5 ¼ ounces/149 grams) | |
| Confectioners’ sugar | ½ cup (2 ounces/57 grams) | Powdered sugar |
| Large egg yolks | 2 | |
| Vanilla extract | 2 teaspoons | |
| Sprinkles, sanding sugar, or chopped toasted nuts | ½ cup | For coating the dough logs |
Instructions
Step 1: Let’s make the dough. Whisk your flour and salt in a bowl. In another bowl, beat the soft butter and both sugars together. Keep going until it looks fluffy and light. Mix in the egg yolks and vanilla. Then, gently stir in the flour mixture. (A hard-learned tip: Your butter must be truly soft for this to work!) Split the dough into two blobs. Shape each into a neat log. Wrap them up tight in plastic. Now, they need a long nap in the fridge. I always plan ahead for this.
Step 2: Time to get colorful. Heat your oven to 325°F. Pour your sprinkles onto a piece of parchment paper. Unwrap one sleepy dough log. Roll it gently in the sprinkles. Press so the whole outside gets covered in joy. Line two baking sheets with parchment. Doesn’t that look cheerful already? I still laugh at how this part makes me feel like a kid again.
Step 3: Now, we slice and bake. Use a sharp knife to cut the coated log into rounds. Make them about as thick as a pencil. Place them on your sheets with a little space between. Bake for 12 to 15 minutes. Swap the sheet positions halfway through. You’ll know they’re done when the edges are just golden. Let them cool on the sheet for a few minutes. Then move them to a rack. What’s your favorite sprinkle color? Share below! Repeat everything with the second log.
Creative Twists
You can make these cookies your own. It’s so much fun to play with flavors. Try one of these easy ideas next time you bake.
Lemon Sunshine: Add the zest of one lemon to the dough. Use yellow sanding sugar to roll them in.
Chocolate Swirl: Mix 2 tablespoons of cocoa powder into half the dough. Marble the two doughs together before shaping.
Birthday Cake: Use rainbow sprinkles and add 1/4 teaspoon of almond extract with the vanilla.
Which one would you try first? Comment below!
Serving & Pairing Ideas
These cookies are wonderful all on their own. But sometimes, a little extra makes it a party. For a special treat, sandwich two cookies with a scoop of vanilla ice cream. Or, crumble them over a bowl of fresh berries. Doesn’t that sound lovely? They also look beautiful on a vintage plate.
For drinks, a cold glass of milk is the classic choice. It just feels right. For the grown-ups, a little glass of cream sherry is a nice match. Its sweetness dances with the vanilla. Which would you choose tonight?
Keeping Your Cookie Logs Happy
These cookie dough logs love the cold. Wrap them tight in plastic wrap. They can chill in your fridge for three days. You can also freeze them for three months. This is a wonderful make-ahead trick.
I remember my first time. I froze a log for a busy week. It felt like a gift from my past self. Just slice and bake when you need a treat. Batch cooking like this saves time and stress. It means fresh cookies are always possible.
Baked cookies keep in a tin for a week. They also freeze well for a month. Let them thaw at room temperature. Have you ever tried storing cookie dough this way? Share below!
Cookie Troubles and Easy Fixes
First, dough too crumbly? Your butter may be too cold. Soften it on the counter for an hour. Properly creamed butter makes a smooth dough. This matters for a tender, melt-in-your-mouth cookie.
Second, cookies spreading too much? The dough logs were not chilled enough. I once baked them right away. They turned into flat puddles! Chilling firms the butter. This gives you perfect, neat slices.
Third, sprinkles won’t stick? Roll the log right after shaping. The dough is slightly sticky then. This small step makes a big, joyful difference. Which of these problems have you run into before?
Your Quick Questions, Answered
Q: Can I make these gluten-free? A: Yes! Use a good gluten-free flour blend. Add 1/4 teaspoon xanthan gum too.
Q: How far ahead can I make the dough? A: You can make it up to 3 days ahead. Or freeze the logs for 3 months.
Q: What can I use instead of sprinkles? A: Try sanding sugar or chopped toasted nuts. Both add lovely crunch and flavor.
Q: Can I double the recipe? A: Absolutely. Just mix in two separate batches. This ensures everything blends properly.
Q: Any optional tips? A: A pinch of cinnamon in the dough is nice. Fun fact: Vanilla comes from orchids! Which tip will you try first?
From My Kitchen to Yours
I hope you love making these cookies. They hold so many happy memories for me. The kitchen is my favorite place to share stories. I would love to hear yours too.
Please tell me all about your baking adventure. Have you tried this recipe? Let me know how it turned out in the comments. I read every single one.
Happy cooking!
—Fiona Brooks.
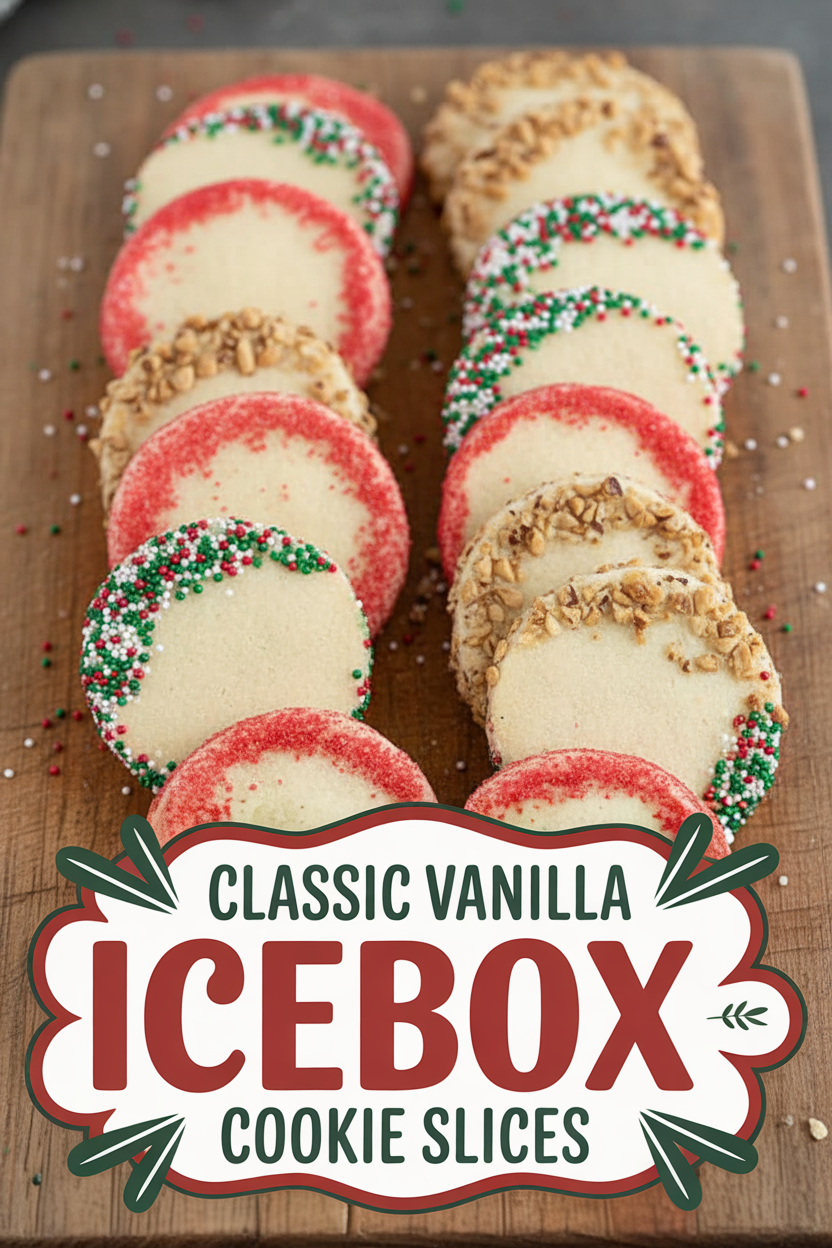
Classic Vanilla Icebox Cookie Slices
Description
Classic, buttery vanilla icebox cookies rolled in colorful sprinkles for a festive and delicious treat.
Ingredients
Instructions
- In a medium bowl, combine the flour and salt with a whisk. In a stand mixer with the paddle attachment, cream the softened butter with both sugars on medium-high speed until light and fluffy, about 3 to 6 minutes. Mix in the egg yolks and vanilla until incorporated. Lower the mixer speed and gradually add the flour mixture, mixing just until a dough forms. Split the dough into two equal portions. Shape each portion into a 6-inch log, wrap them tightly in plastic wrap, and chill for at least 2 hours or for up to 3 days.
- Preheat your oven to 325°F and position racks in the upper-middle and lower-middle of the oven. Place your sprinkles on a parchment-lined baking sheet. Roll each chilled dough log in the sprinkles to coat the outside completely. Prepare two additional baking sheets by lining them with parchment paper.
- Slice one coated log into rounds about 1/4-inch thick. Arrange the rounds on the prepared sheets, spacing them apart. Bake for 12 to 15 minutes, swapping and rotating the sheets halfway through, until the edges are just starting to turn golden. Allow the cookies to cool on the sheets for 3 minutes before moving them to a wire rack. Repeat the slicing and baking process with the second log. Let all cookies cool completely before serving.
Notes
- For best results, ensure the dough logs are very firm before slicing. Dough can be frozen for up to 1 month; thaw slightly before slicing and baking.


Leave a Reply