
My Granddaughter’s Favorite Cookie Project
Let’s make some festive cookies. This recipe is for everyone. It uses gluten-free flour. My granddaughter Lily helped me test it. She danced while the mixer ran. I still laugh at that.
We make the dough first. Cream the butter and sugar until fluffy. Doesn’t that smell amazing? Then we add eggs and flour. The dough needs a good chill. This matters because cold dough is easier to cut. It holds its shape better.
The Rolling Trick My Mother Taught Me
Rolling dough can be sticky. Here is my trick. Use two big sheets of parchment paper. Put the dough in the middle and roll. No mess on the counter! Flip the whole thing over once. This helps it roll evenly.
Then, chill the rolled dough on a tray. Patience is important here. This second chill makes cutting shapes a dream. What cookie cutter shape is your favorite? I love stars and little trees.
Baking Time is Story Time
While the cookies bake, the kitchen gets warm. It’s a good time to share stories. I remember baking these with Lily last year. We made a snowman cookie with a crooked smile. It was our favorite.
Bake them until the edges just turn golden. Let them cool completely on the sheet. This matters so much. A warm cookie will melt the glaze. We want pretty cookies, not messy ones! Fun fact: letting cookies cool makes them crispier too.
The Simple, Shiny Glaze
The glaze is just three things. Cream cheese, milk, and powdered sugar. Mix it until smooth. It should drizzle off your spoon slowly. If it’s too thick, add a tiny bit more milk.
Spread or drizzle it on the cool cookies. Then you must wait again. The glaze needs to set. This is the hardest part! Do you like a lot of glaze or just a little?
Why We Share What We Bake
These cookies are more than a treat. They are made to be shared. Giving food is a way to say, “I thought of you.” That is a beautiful thing. It connects us.
Making them gluten-free means more friends can join. No one feels left out. That is the best feeling. Who will you share your cookie collection with this year? Tell me about them.
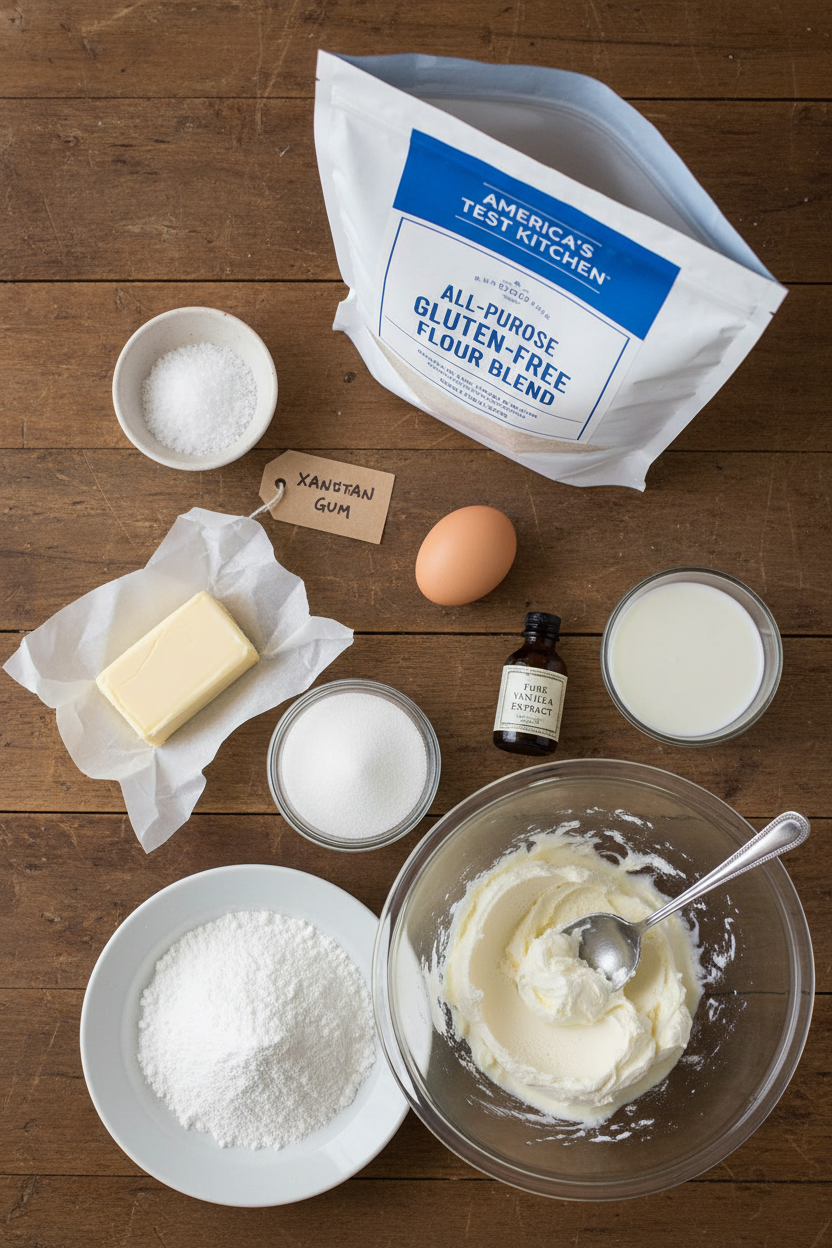
Ingredients:
| Ingredient | Amount | Notes |
|---|---|---|
| America’s Test Kitchen All-Purpose Gluten-Free Flour Blend | 12½ ounces (354 grams / 2¾ cups) | For the cookie dough |
| Salt | ½ teaspoon | For the cookie dough |
| Xanthan gum | ¼ teaspoon | For the cookie dough |
| Unsalted butter | 16 tablespoons | Softened, cut into pieces; for the cookie dough |
| Superfine sugar | 7 ounces (198 grams / 1 cup) | For the cookie dough |
| Large egg | 1 | For the cookie dough |
| Large egg yolk | 1 | For the cookie dough |
| Vanilla extract | 2 teaspoons | For the cookie dough |
| Cream cheese | 1 tablespoon | Room temperature; for the glaze |
| Milk | 2-3 tablespoons | For the glaze |
| Confectioners’ sugar | 6 ounces (170 grams / 1½ cups) | For the glaze |
My Festive Cookie Cut-Outs
Hello, my dear. Come sit at the counter. I’m making my special cut-out cookies today. They are gluten-free, but nobody can ever tell. The secret is in the chill. I still laugh at that. My grandson once tried to skip the chilling step. His snowman cookies turned into puddles! Chilling the dough makes it behave. Doesn’t that smell amazing? That’s the vanilla and sweet butter. It reminds me of my own grandma’s kitchen.
Instructions
Step 1: First, mix your flour, salt, and xanthan gum in a bowl. Set it aside. Now, beat the soft butter and sugar in your mixer. Beat it until it looks fluffy and light. Then, add the whole egg, yolk, and vanilla. Mix it all in well. (A hard-learned tip: Your butter must be soft, but not melted. Just a gentle press with your finger should leave a dent.)
Step 2: Turn your mixer speed down to low. Slowly add your flour mixture. Mix just until a dough forms. Divide this dough into four balls. Flatten each into a disk. Wrap them tightly in plastic. They need a long nap in the fridge. This makes rolling so much easier later. What’s the most important tool for this step: the mixer or the plastic wrap? Share below!
Step 3: Work with one dough disk at a time. Roll it out between two sheets of parchment paper. This is my favorite trick. No messy flour everywhere! Peel the top paper off, then lay it back on. Flip the whole thing over. Peel off the other paper and lay it back too. Slide this parchment sandwich onto a tray. Chill it again for 30 minutes.
Step 4: Heat your oven to 325°F. Line your baking sheets. Take one chilled dough sheet out. Peel off one parchment piece. Now, press your cookie cutters right into the dough. Leave the bottom paper on. Move the shapes to your baking sheet. Save the scraps to chill and re-roll. Bake one sheet at a time. They are done when the edges just barely color.
Step 5: Let the cookies cool completely. Now for the fun part: the glaze! Whisk the soft cream cheese with a little milk. Then whisk in the powdered sugar. If it’s too thick, add a tiny bit more milk. Use a spoon to drizzle or spread it on. Let the glaze set for 30 minutes. Then they are ready to share. I always sneak one before the glaze sets.
Creative Twists
Sparkling Sugar Snow: Sprinkle the cookies with sanding sugar before baking. They will twinkle like frost.
Citrus Zest Glaze: Add a little lemon or orange zest to your glaze. It gives a sunny, fresh taste.
Jam Button Hearts: Use a tiny cutter to make a hole in the center before baking. After glazing, fill the hole with a dot of red jam.
Which one would you try first? Comment below!
Serving & Pairing Ideas
These cookies are perfect on a big platter. Mix all the shapes together. For a cozy treat, serve them with a bowl of vanilla ice cream. A cookie on top is just right. For drinks, a warm cup of spiced apple cider is my favorite. The cinnamon smells so good. For the grown-ups, a small glass of sweet sherry pairs nicely. It sips like a holiday in a glass. Which would you choose tonight?

Keeping Your Cookie Joy
Let’s keep these cookies tasting fresh. Cool them completely first. Store them in a tight container at room temperature. They will stay lovely for up to five days.
You can freeze the baked cookies for a month. Just layer them with parchment paper in a freezer bag. Thaw them on the counter when you need a sweet treat.
You can also freeze the dough disks for later. This is my favorite batch-cook trick. It means fresh cookies are always an hour away.
I once forgot a batch in the freezer for two months. They baked up perfectly for a surprise visit from my grandkids. Having dough ready is a little gift to your future self.
Have you ever tried storing cookie dough this way? Share below! It matters because life gets busy. A little prep brings big, happy moments later.
Cookie Troubles? Easy Fixes Here
Is your dough too crumbly? It might be too cold. Let it sit on the counter for ten minutes. Then try rolling it again.
Do your shapes spread while baking? The dough was likely too warm. I remember my first batch turned into blobs. Chilling the rolled dough is the secret step.
Is the glaze too runny? You added too much milk. Just whisk in a bit more confectioners’ sugar. It will thicken right up.
Fixing these small issues builds your cooking confidence. It also makes your treats look as good as they taste. Which of these problems have you run into before?
Your Quick Questions, Answered
Q: Can I use a different gluten-free flour?
A: I recommend the one listed. Different blends absorb liquid differently. Your results may change.
Q: Can I make the dough ahead?
A: Yes! The disks keep in the fridge for two days. Or freeze them for a month.
Q: What if I don’t have superfine sugar?
A: Regular granulated sugar works just fine. Your cookies might have a tiny bit more texture.
Q: Can I double the recipe?
A: Absolutely. Just mix it in two separate batches. This ensures everything blends evenly.
Q: Any fun decorating tips?
A: Add a drop of food coloring to the glaze. Or sprinkle on colored sugar before it sets. *Fun fact: The first decorated cookies were made in Persia over a thousand years ago!*
Which tip will you try first?
From My Kitchen to Yours
I hope you have fun making these festive cookies. The kitchen is my favorite place for making memories. I would love to hear about your baking adventure.
Tell me about the shapes you cut. Did you add any special sprinkles? Sharing our stories makes the food even sweeter.
Have you tried this recipe? Please leave a comment below and tell me all about it. Happy cooking!
—Fiona Brooks.

Festive Gluten Free Cookie Collection
Description
A delightful collection of festive, gluten-free cut-out cookies with a smooth cream cheese glaze, perfect for holiday baking.
Ingredients
For the Glaze:
Instructions
- Prepare the Dough: In a bowl, combine the gluten-free flour blend, salt, and xanthan gum. Set this dry mixture aside. Using a stand mixer with the paddle attachment, cream the softened butter and superfine sugar together on medium-high speed until the mixture is light and fluffy, about 3 minutes. Beat in the whole egg, egg yolk, and vanilla extract until fully incorporated. Reduce the mixer speed to low and gradually add the flour mixture, mixing just until a cohesive dough forms, 2 to 4 minutes. Divide the dough into four equal portions. Shape each portion into a 4-inch disk, wrap tightly in plastic wrap, and chill in the refrigerator until firm, about 1 hour.
- Roll and Chill the Dough: Work with one disk of dough at a time. Roll it out to a 1/8-inch thickness between two large sheets of parchment paper. Carefully peel off the top sheet of parchment, then lay it back lightly on the dough. Flip the entire dough and parchment sandwich over and remove the second sheet of parchment, also replacing it. Transfer the dough, still encased in parchment, onto a baking sheet and refrigerate until firm, about 30 minutes.
- Cut and Bake the Cookies: Preheat your oven to 325°F with a rack in the middle position. Line two baking sheets with parchment paper. Remove one sheet of chilled dough from the refrigerator. Peel off one piece of parchment. Using cookie cutters, cut shapes directly through the dough, leaving the bottom parchment in place. Transfer the cut cookies to the prepared baking sheets, spacing them about 1½ inches apart. Gather and chill the dough scraps to reroll once. Bake one sheet at a time for 12 to 14 minutes, rotating the sheet halfway through, until the cookies feel firm and the edges just begin to color. Let the cookies cool on the sheet for 5 minutes before moving them to a wire rack to cool completely before glazing.
- Make and Apply the Glaze: For the glaze, whisk the room-temperature cream cheese with 2 tablespoons of milk in a bowl until completely smooth. Whisk in the confectioners’ sugar. If the glaze is too thick, add the remaining milk, a little at a time, until it reaches a spreadable consistency. Using the back of a spoon, drizzle or spread a small amount of glaze onto each fully cooled cookie. Allow the glaze to set for at least 30 minutes before serving.
Notes
- Ensure all ingredients, especially butter and cream cheese, are at room temperature for proper mixing. Chilling the dough is crucial for easy handling and to prevent spreading. Store fully cooled and glazed cookies in an airtight container at room temperature for up to 5 days.


Leave a Reply