My First Slab Pie Fumble
I once tried to make this pie for a big family picnic. I was in a rush. I didn’t let the apples cool enough. The hot apples made my bottom crust soggy before it even baked. I still laugh at that. The pie was a bit of a mess, but everyone ate it anyway. They said it tasted like love, just a little gooey.
That’s why we cool the apples completely. It matters because a hot filling steals the crunch from your beautiful crust. We want that flaky, buttery bite in every forkful. Have you ever had a kitchen mishap turn out okay in the end? I’d love to hear your story.
Why This Crust is Special
This crust has a secret ingredient. Sour cream. It sounds funny, I know. But it makes the dough so easy to work with. It stays tender and flaky. The little bits of cold butter steam up in the oven. That’s what makes all those wonderful, crisp layers.
Here’s a fun fact: using frozen butter is a baker’s best trick. Grating it on a box grater works too. This matters because good pastry is the heart of a great pie. It’s the cozy blanket for the sweet filling. Do you have a favorite pie crust tip? Share it with me.
The Magic of Cooking Apples First
We cook the apples on the stove first. This is the big trick. It means no big gaps in your pie. The apples soften and release their juice early. Then we drain that extra juice away. So your pie slices hold their shape perfectly.
Doesn’t that smell amazing? The cinnamon and lemon zest with the bubbling apples. It fills your whole kitchen with happiness. This step matters. It gives you control. You get a slice that is full of apple, not just juice.
A Pie for Later
Life gets busy. Sometimes you need dessert ready in the freezer. This pie is perfect for that. You can freeze the whole thing, or just the parts. It’s like giving your future self a delicious gift.
Imagine having a homemade pie, ready to bake. On a busy Tuesday, it feels like a miracle. Do you like to keep freezer meals or treats on hand? What’s your favorite thing to save for a busy day?
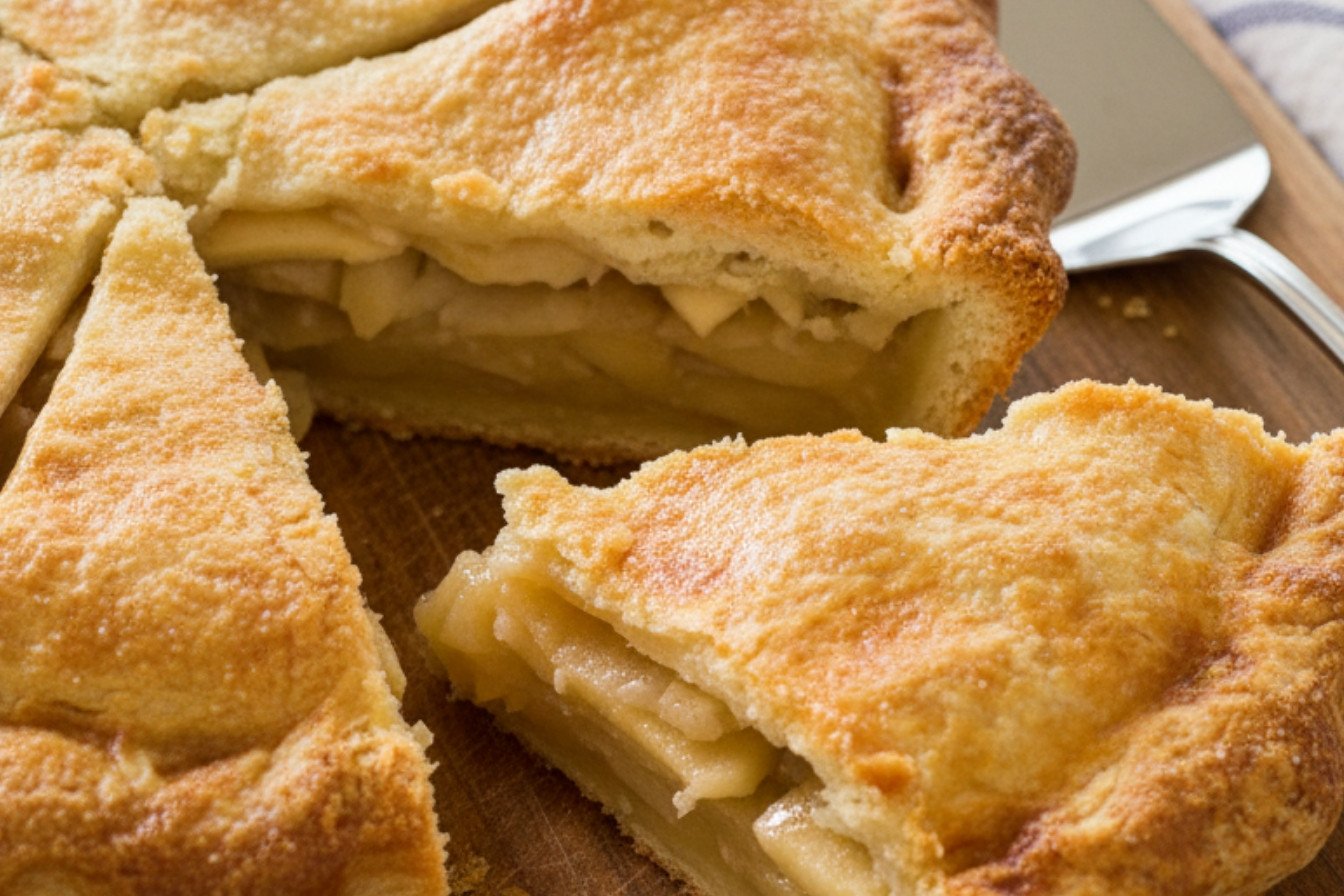
The Sweet & Tart of It
We use two kinds of apples. Tart ones, like Granny Smith. And sweet ones, like Honeycrisp. This is important. The tart apples keep the pie from being too sweet. The sweet apples make it taste like caramel.
The brown sugar helps with that caramel flavor too. It all mixes together in the oven. You get a deep, cozy taste. Every bite is a perfect balance. It’s the kind of flavor that makes you close your eyes and smile.
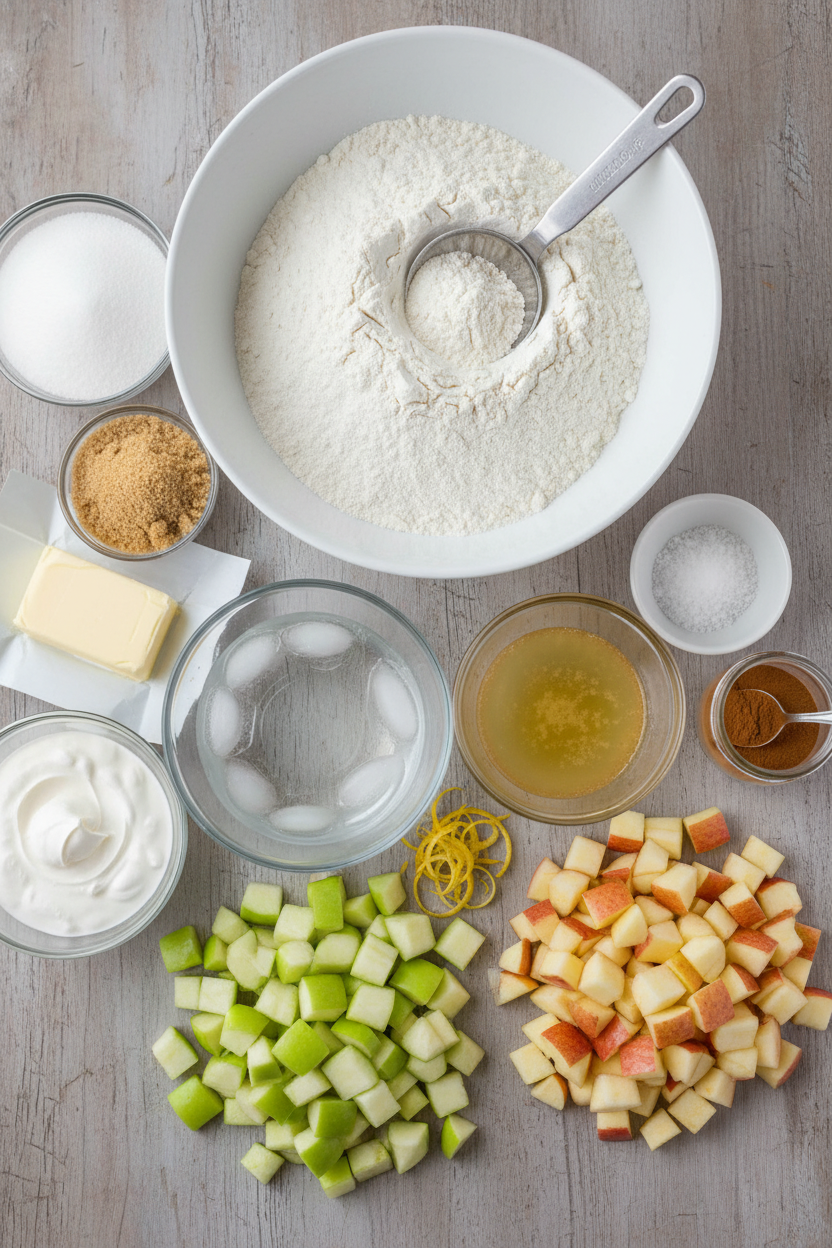
Ingredients:
| Ingredient | Amount | Notes |
|---|---|---|
| Unbleached all-purpose flour | 2 ½ cups (12 ½ oz/354g) | For the pastry |
| Table salt | 1 tsp + ¼ tsp | 1 tsp for pastry, ¼ tsp for filling |
| Sugar | 1 tbsp + ½ cup + 1 tsp | 1 tbsp for pastry; ½ cup + 1 tsp granulated for filling |
| Unsalted butter | 16 tbsp (2 sticks), cold | For the pastry |
| Sour cream | 3 tbsp | For the pastry |
| Ice water | ⅓ cup (or more if needed) | For the pastry |
| Light brown sugar | ¼ cup packed (1 ¾ oz/50g) | For the filling |
| Lemon juice | 1 tbsp | For the filling |
| Lemon zest | ½ tsp grated | For the filling |
| Ground cinnamon | ⅛ tsp | For the filling |
| Tart apples (firm) | 2 ½ lbs (1134g), peeled & sliced | e.g., Granny Smith |
| Sweet apples (firm) | 2 ½ lbs (1134g), peeled & sliced | e.g., Honeycrisp, Fuji |
| Egg white | 1, beaten lightly | For glaze on top crust |
Instructions
Step 1: Let’s make the pastry. Pulse the flour, salt, and sugar in your food processor. Drop in the cold butter cubes. Pulse until the butter looks like little peas. Mix the sour cream and ice water in a bowl. Pour half into the processor and pulse. Add the rest and pulse again. Pinch the dough to test it. (If it’s too crumbly, add a spoonful more ice water.) It should stick together nicely. I still laugh at that time I added warm water. What a sticky mess!
Step 2: Shape and chill the dough. Dump the dough onto your counter. Divide it into two equal parts. Pat each part into a flat, round disk. Wrap each disk tightly in plastic wrap. Pop them in the fridge for at least an hour. This chill time is so important. It makes the pastry flaky and easy to roll. Do you know what happens if you skip this step? Share below!
Step 3: Now for the apple filling. Mix both sugars, salt, lemon zest, and cinnamon in a big bowl. Toss all your apple slices in this sweet mix. Cook them in a big pot on the stove. Stir them often for about 15 minutes. The apples will get tender and smell amazing. Spread them on a baking sheet to cool completely. (This step keeps your bottom crust from getting soggy.)
Step 4: Roll out your first crust. Roll one dough disk between two parchment sheets. Aim for a 12-inch circle. If it gets soft, just chill it again. Peel off one parchment sheet. Flip the dough into your pie plate. Gently press it in. Put the whole plate in the fridge. Roll out the second disk for the top crust. Chill that one on a sheet pan, too. Patience makes perfect pie.
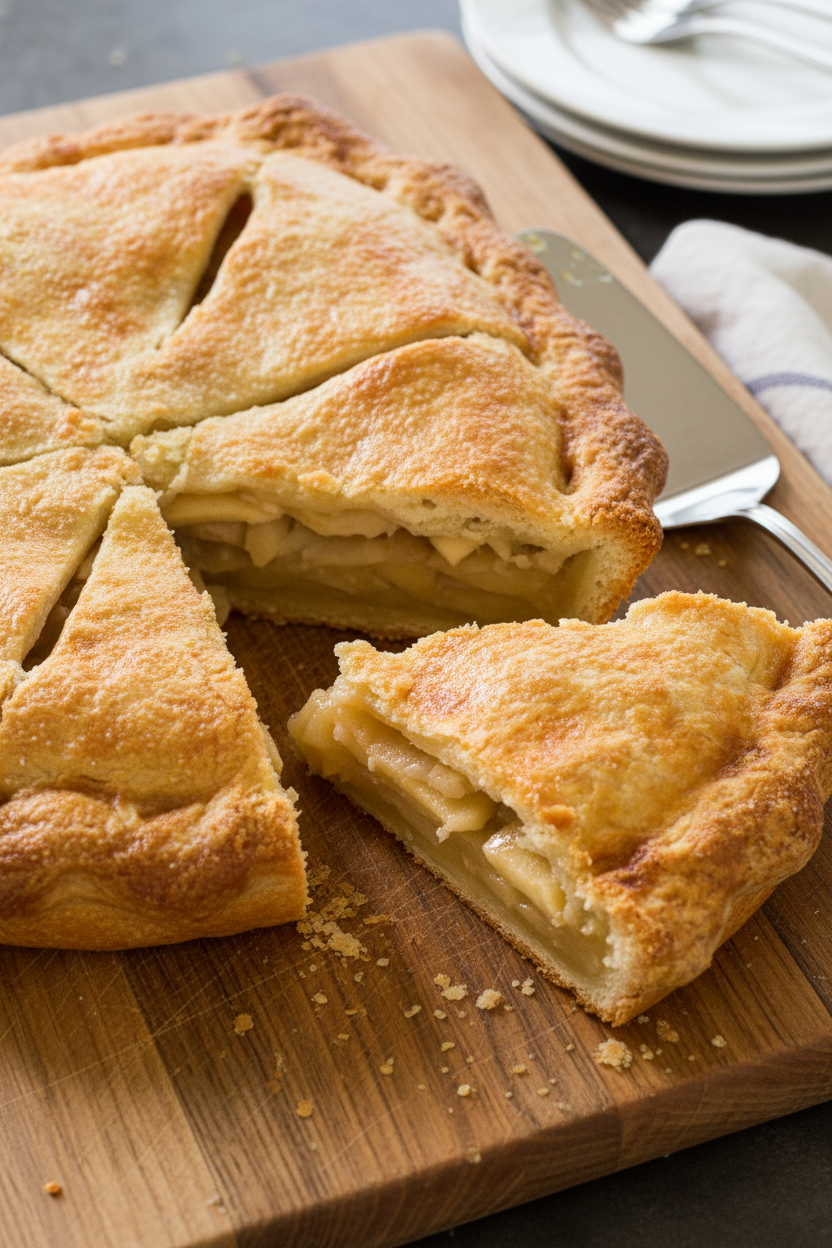
Step 5: Assemble your masterpiece. Drain the cooled apples in a colander. We want the flavor, not extra juice. Pile the apples into your chilled bottom crust. Sprinkle with lemon juice. Take your top crust from the fridge. Peel and flip it over the filling. Trim and crimp the edges together. Cut a few slits in the top. Brush it with beaten egg white and a sprinkle of sugar.
Step 6: Time to bake. Put your pie on a hot baking sheet in the oven. Bake for 45 to 55 minutes. You’ll know it’s done when the crust is a deep, golden brown. Oh, that smell will fill your whole house. Let the pie cool on a rack for a good, long while. This wait is the hardest part, but it’s worth it.
Creative Twists
Add a handful of fresh cranberries to the apple mix. They pop with a lovely, tart surprise.
Swap the cinnamon for a pinch of cardamom. It gives a warm, cozy, and different flavor.
Drizzle the baked pie with salted caramel sauce. Because more caramel is always a good idea.
Which one would you try first? Comment below!
Serving & Pairing Ideas
Serve a warm slice with a big scoop of vanilla ice cream. The melty cream on hot pie is heaven. A little dollop of whipped cream is lovely, too. For a fancy touch, add a sprinkle of toasted pecans on top. They add a nice little crunch. My grandson always asks for extra nuts.
This pie pairs beautifully with a hot cup of spiced chai tea. It just feels right. For a grown-up treat, a small glass of sweet bourbon is a cozy match. Which would you choose tonight?
Keeping Your Slab Pie Happy
Let’s talk about storing your beautiful pie. Cool it completely first. Then wrap it tight in plastic. It will keep on the counter for two days. For longer, freeze it.
You can freeze the whole pie before baking. Just skip the egg wash. Wrap it in two layers of plastic and foil. Bake it frozen, adding a few extra minutes. I once forgot to label a frozen pie. We had a delicious mystery dessert for weeks!
Batch cooking saves so much time. Make a double batch of the apple filling. Freeze half for a future pie. A ready-to-go filling is a gift to your future self. This matters because good food should make life easier, not harder. Have you ever tried storing it this way? Share below!
Pie Problems? Easy Fixes!
Is your dough too sticky? Just chill it. Cold dough is much easier to handle. I remember when my dough stuck to everything. A little time in the fridge fixed it.
Is your filling too runny? Draining the cooled apples is key. Shake them in a colander. This step gives you a perfect slice. It matters because a soggy bottom crust is no fun for anyone.
Is your crust browning too fast? Use that preheated baking sheet. It catches drips and helps the bottom cook. This simple trick builds your baking confidence. Which of these problems have you run into before?
Your Quick Questions, Answered
Q: Can I make this gluten-free? A: Yes. Use your favorite gluten-free flour blend. The texture will be a bit more crumbly.
Q: How far ahead can I make it? A: The dough disks can chill for 24 hours. The cooked filling can cool for a few hours before assembly.
Q: What if I don’t have sour cream? A: Plain yogurt works just fine. It adds the same nice tang to the crust.
Q: Can I make a smaller pie? A: You can halve everything. Use a standard 9-inch pie plate. The baking time will be less.
Q: Any optional tips? A: A pinch of nutmeg in the filling is lovely. Fun fact: My grandma always added a tiny pinch for “warmth.” Which tip will you try first?
From My Kitchen to Yours
I hope you love making this caramel apple slab pie. The smell of baking apples is pure joy. It fills your home with warmth and love.
I would love to hear about your baking adventure. Tell me all about it in the comments. Sharing stories is the best part of food. Have you tried this recipe? Let me know how it turned out for you.
Happy cooking!
—Fiona Brooks.
Ultimate Caramel Apple Slab Pie
Description
A stunning and delicious apple pie with a tender all-butter crust and a perfectly balanced, caramel-like apple filling.
Ingredients
All-Butter Pie Pastry:
Apple Filling:
Instructions
- For the Pastry: In a food processor, combine the flour, salt, and sugar with a brief 3-second pulse. Add the frozen butter cubes and pulse about ten times, until the butter pieces are roughly the size of large peas.
- Stir the sour cream and ice water together in a small bowl. Pour half of this mixture into the processor and pulse three times. Add the remaining liquid and pulse again. Test the dough by pinching it; if it seems dry and crumbly, add an additional 1-2 tablespoons of ice water and pulse just until the dough forms cohesive clumps.
- Transfer the dough to a work surface. Divide it in half and shape each portion into a 4-inch disk. Wrap each disk tightly in plastic wrap and refrigerate for 1 to 2 hours, until firm but not rock hard. The dough can be chilled for up to 24 hours; if thoroughly cold, let it sit at room temperature for about 15 minutes before rolling.
- For the Pie: In a large bowl, combine the granulated sugar, brown sugar, salt, lemon zest, and cinnamon. Add the apple slices and toss to coat evenly. Transfer the apples to a Dutch oven. Cover and cook over medium heat, stirring often, for 15 to 20 minutes, until the apples are fork-tender but still intact. They should simmer gently. Spread the cooked apples and their juices on a rimmed baking sheet to cool completely, about 30 minutes. During this time, place an empty rimmed baking sheet on your oven’s lowest rack and preheat the oven to 425°F.
- Roll out one disk of chilled dough between two sheets of parchment paper to a 12-inch circle, about 1/8-inch thick. If the dough gets too soft, return it to the refrigerator to firm up. Remove the top sheet of parchment, flip the dough into a 9-inch pie plate, and peel off the second sheet. Gently press the dough into the plate, leaving any overhang. Refrigerate the crust for 30 minutes.
- Roll out the second dough disk between parchment to another 12-inch circle. Refrigerate this top crust, still between the parchment sheets, for 30 minutes.
- Place a colander over the now-empty mixing bowl. Transfer the cooled apples to the colander and shake to drain off excess juice; discard the juice. Place the drained apples into the chilled bottom crust and sprinkle evenly with the lemon juice.
- Remove the top crust from the refrigerator. Peel off one piece of parchment, flip the dough over the filled pie, and remove the second sheet. Press the edges of the top and bottom crusts firmly together. Trim the excess dough, then crimp or flute the sealed edge. Cut four 2-inch slits in the top crust. Lightly brush the entire top with the beaten egg white and sprinkle with the remaining teaspoon of sugar.
- Place the pie on the preheated baking sheet in the oven. Bake for 45 to 55 minutes, until the crust is a deep golden brown. Transfer the pie to a wire rack and let it cool for at least 1.5 hours before slicing.
Notes
- Freezing Instructions: You can freeze this pie either fully assembled or with components separated. For best results within two weeks, freeze the assembled pie (without the egg wash) until solid, then wrap it tightly in a double layer of plastic wrap and foil. To bake, add the egg wash and sugar, cut slits, and bake directly from frozen, adding 5-10 minutes to the baking time. For longer storage of several months, freeze the cooked, drained apple filling and the shaped pastry disks separately. Thaw both overnight in the refrigerator before assembling and baking as directed.


Leave a Reply