A Cookie with a Little Heart
Hello, my dear. Come sit. Let’s talk about cookies. These are special. They are chocolate raspberry thumbprint cookies. I call them “cookies with a little heart.” That jam center is like a sweet secret. You find it when you take a bite.
I first made these for my granddaughter’s school bake sale. She said they looked like tiny nests. I still laugh at that. They sold out in ten minutes! That matters because food made with a happy thought just tastes better. Don’t you think?
The Magic of Thumbprints
Making the well is the fun part. You use your thumb or a spoon. You press a little home for the jam. It’s like tucking a berry into a chocolate bed. This step makes the cookie yours. Every baker’s thumbprint is a bit different.
Fun fact: These cookies are sometimes called “bird’s nest cookies” in other places! See? My granddaughter was right. What’s your favorite name for a cookie? Do you have a family name for a special treat?
Why the Little Steps Matter
Toast the pecans first. It only takes a few minutes. This wakes up their warm, cozy flavor. Doesn’t that smell amazing? And roll the dough balls in them right away. The nuts will stick to the soft dough.
Let the butter get soft on the counter. Not melted, just soft. This matters. It makes the dough fluffy when you mix it. Good cookies are about patience, not speed. It’s a small lesson that helps with many things.
The Sweet and Tart Surprise
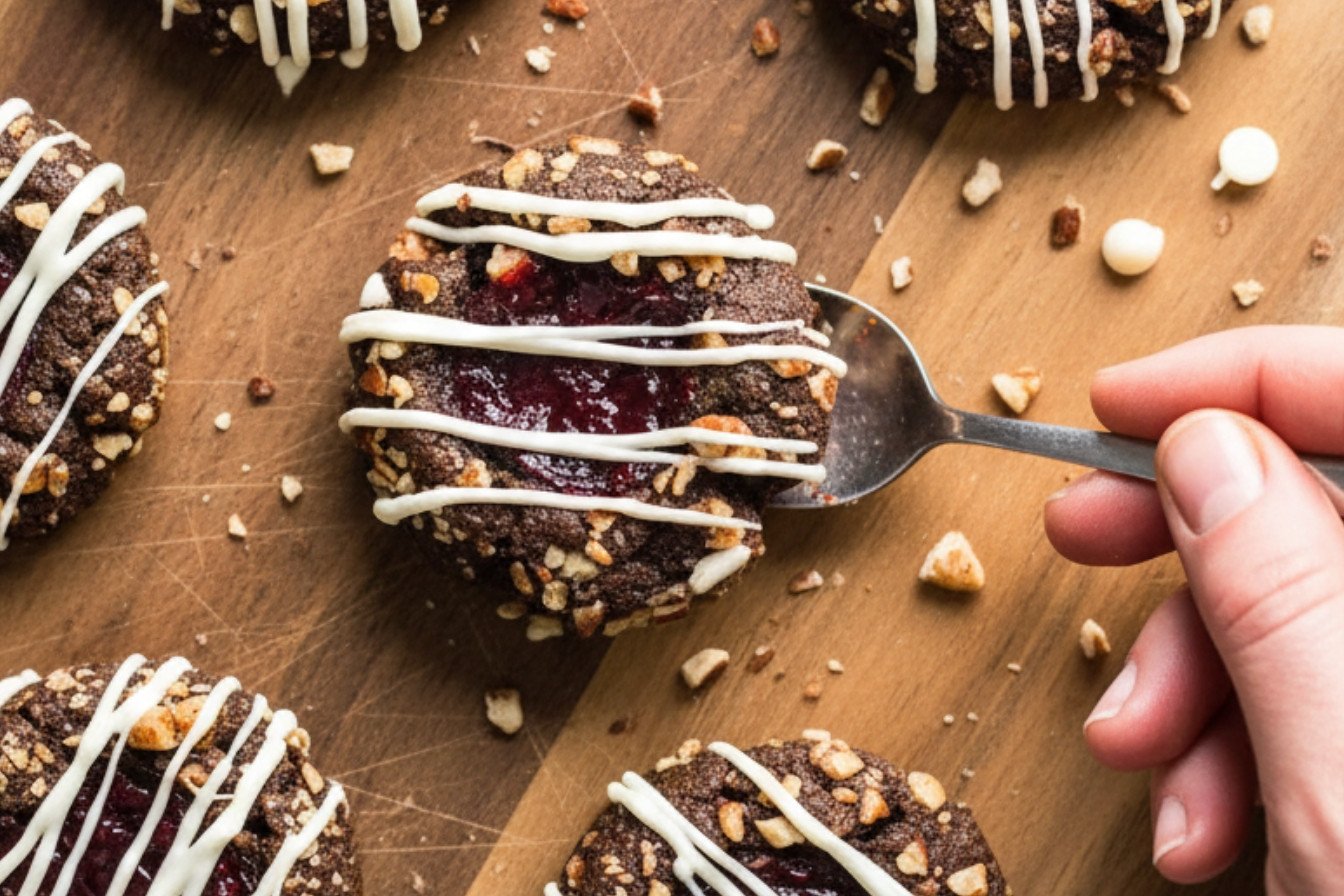
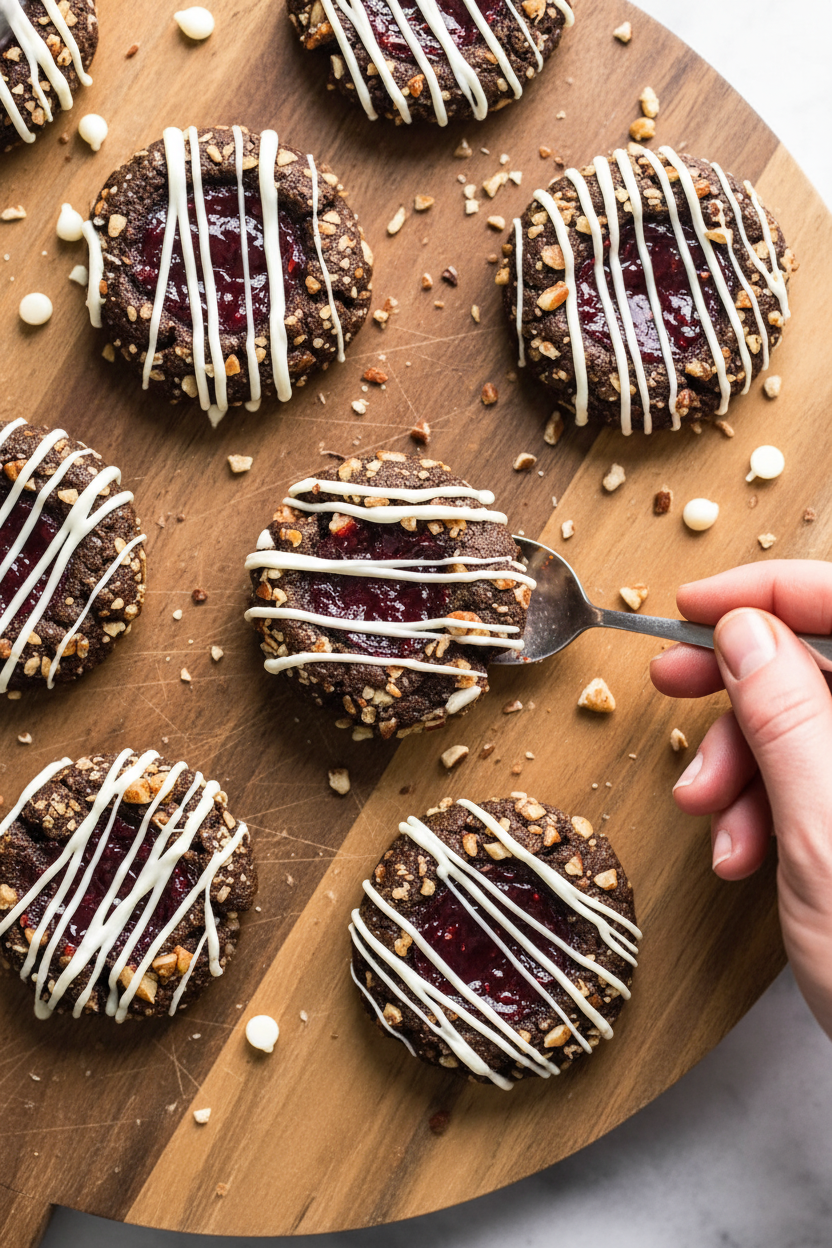
The flavors here sing together. Deep chocolate. Buttery pecans. Then, the bright raspberry jam pops in your mouth. It’s a party of tastes. The white chocolate drizzle is the final happy note. It makes them look dressed for a party.
Use seedless jam if you can. It gives a smooth, shiny center. Do you prefer raspberry or another jam? Strawberry is lovely too. This is your cookie. You can choose the heart.
A Lesson in Cooling
Here is the hard part. You must let them cool. I know, I know. The kitchen smells too good. But wait. If you drizzle the white chocolate on warm cookies, it will melt right off. Let them sit on the rack.
This waiting matters too. It teaches us that the best finishes need a solid start. While you wait, you can lick the spoon. That’s the cook’s reward. What’s your favorite part of baking? Is it mixing, shaping, or the first taste?
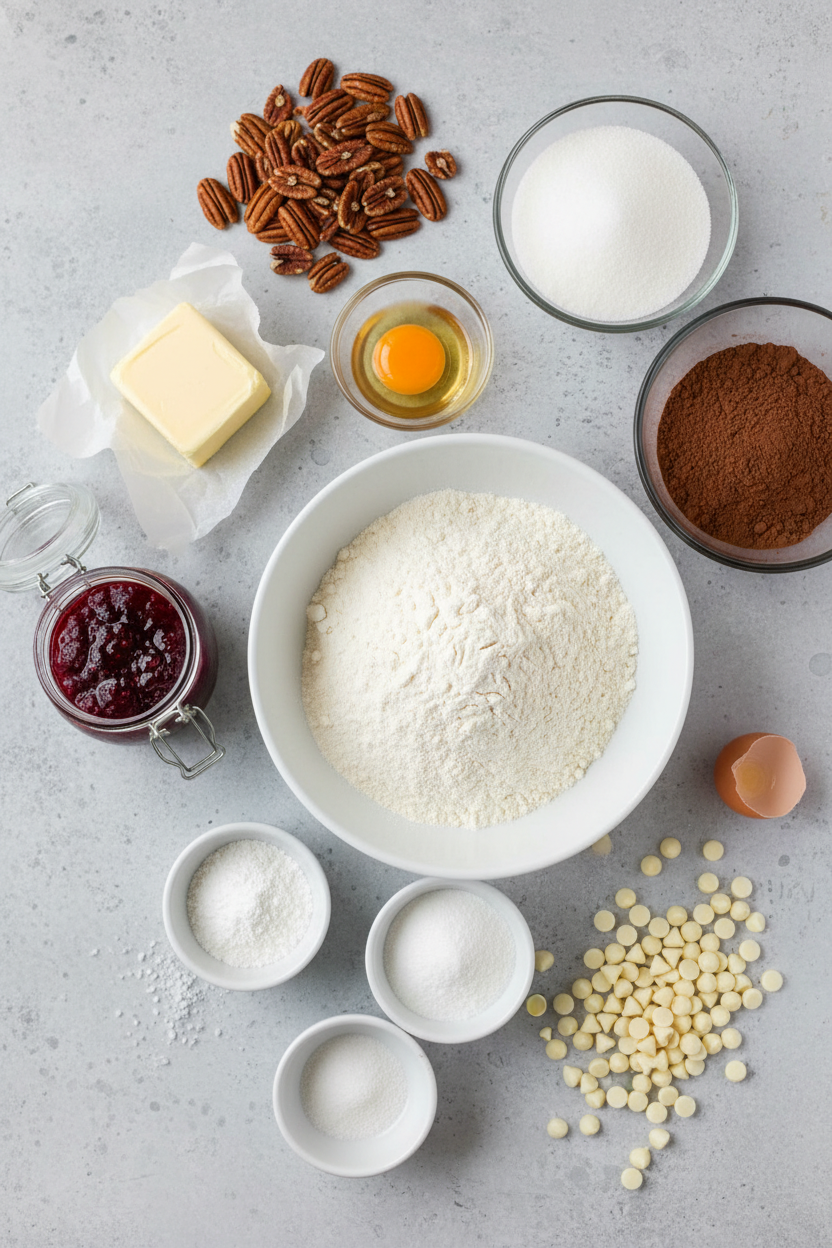
Ingredients:
| Ingredient | Amount | Notes |
|---|---|---|
| All-purpose flour | 1 ½ cups (7½ ounces/213 grams) | |
| Dutch-processed cocoa powder | ½ cup (1½ ounces/43 grams) | |
| Baking powder | ¼ teaspoon | |
| Baking soda | ¼ teaspoon | |
| Salt | ¼ teaspoon | |
| Unsalted butter | 8 tablespoons (1 stick) | Softened |
| Sugar | 1 cup (7 ounces/198 grams) | |
| Large egg | 1 | |
| Vanilla extract | 1 ½ teaspoons | |
| Pecans | 1 cup | Toasted and chopped fine |
| Seedless raspberry jam | 6 tablespoons | For filling |
| White chocolate chips | ½ cup (3 ounces/85 grams) | Melted, for drizzling |
My Chocolate Raspberry Memory Cookies
These cookies always remind me of my granddaughter, Lily. She loved helping me press the jam into the chocolate dough. Her little thumbs would get so sticky. I still laugh at that. Now, baking them fills my kitchen with the best smell. It’s like sweet chocolate and warm nuts. Doesn’t that smell amazing? I think the secret is the toasted pecans. They add a cozy, buttery crunch. Let’s make a batch together. It’s simpler than it looks, I promise.
Instructions
Step 1: First, get your oven ready. Heat it to 350°F. Put racks in the top and bottom thirds. Line two baking sheets with parchment paper. Now, mix your dry stuff. Whisk the flour, cocoa, baking powder, soda, and salt. This makes everything blend smoothly later. My tip is to whisk it well. (A little extra whisking makes the cookies extra tender).
Step 2: Let’s make the dough. Cream the soft butter and sugar. Use a mixer until it’s pale and fluffy. Then blend in the egg and vanilla. It will look lovely. Now, add your dry mixture. Mix on low speed just until it comes together. Can you guess what happens if you mix too long? Share below!
Step 3: Time for the fun part. Put chopped toasted pecans in a shallow dish. Roll dough into one-inch balls. Roll each ball in the nuts, pressing gently. Place them two inches apart on your sheets. Use a teaspoon’s back to press a deep well. Fill each well with about half a teaspoon of jam.
Step 4: Bake for about 10 minutes. Switch the sheet positions halfway through. This helps them bake evenly. Let cookies cool on the sheets for 5 minutes. Then move them to a rack. Wait until they are completely cool. This patience is important for the next step. (A warm cookie will make the chocolate melt right off).
Step 5: Finally, melt your white chocolate chips. Drizzle it over the cooled cookies. Let the chocolate set for 15 minutes. Then, they are ready to share. The jam stays a bit warm inside sometimes. I always let Lily have the first one. She says it’s like a sweet, secret surprise.
Creative Twists
Try apricot or blackberry jam instead of raspberry. Use milk or dark chocolate chips in the dough instead of cocoa. Roll the balls in crushed pretzels for a salty-sweet crunch. Which one would you try first? Comment below!
Serving & Pairing Ideas
These cookies are perfect with a cold glass of milk. For a fancy touch, dust them with powdered sugar. You could also serve them on a pretty plate. For drinks, a warm cup of peppermint tea is lovely. For the grown-ups, a sweet dessert wine pairs beautifully. Which would you choose tonight?
Keeping Your Cookies Happy
These cookies keep well in a sealed container. They last about five days on the counter. For longer storage, freeze them. Just layer them between parchment paper in a freezer bag.
I once froze a whole batch for my grandson’s visit. He said they tasted just-baked! This is why batch cooking matters. It lets you share sweet moments anytime.
You can freeze the dough balls, too. Roll them in nuts and freeze on a sheet first. Then bag them up. Bake a few fresh cookies whenever you want.
Have you ever tried storing cookies this way? Share below!
Cookie Troubles? Easy Fixes Here
First, if your dough is too sticky, chill it. Twenty minutes in the fridge firms it up. This makes rolling the balls much easier.
Second, if the jam bubbles over, use less. A half-teaspoon is plenty. I remember when my jam ran like a river! It still tasted good, though.
Third, if the nuts won’t stick, roll the dough ball in your hands a bit longer. The warmth and moisture helps. Getting the texture right matters. It builds your cooking confidence with every batch.
Fun fact: The thumbprint is a classic shape. It holds the sweet jam just right.
Which of these problems have you run into before?
Your Quick Questions, Answered
Q: Can I make these gluten-free?
A: Yes! Use a good gluten-free flour blend. Make sure it has xanthan gum.
Q: Can I make the dough ahead?
A: Absolutely. Keep it covered in the fridge for up to two days.
Q: I don’t have pecans. What can I use?
A: Walnuts or almonds work great. You can even leave the nuts out.
Q: Can I make a smaller batch?
A: You can cut all the ingredients in half. It works perfectly.
Q: Is the white chocolate drizzle optional?
A: Of course! The cookies are delicious with or without it.
Which tip will you try first?
From My Kitchen to Yours
I hope you love making these cookies. They always remind me of cozy afternoons. Baking is about sharing joy and creating memories.
I would love to hear about your baking adventure. Tell me all about it in the comments.
Have you tried this recipe? I can’t wait to hear your story.
Happy cooking!
—Fiona Brooks.

Chocolate Raspberry Thumbprint Cookies
Description
Rich chocolate cookies rolled in toasted pecans, filled with raspberry jam, and drizzled with white chocolate.
Ingredients
Instructions
- Heat your oven to 350°F, positioning racks in the upper-middle and lower-middle slots. Line two baking sheets with parchment. In a bowl, whisk together the flour, cocoa powder, baking powder, baking soda, and salt.
- Using an electric mixer, cream the softened butter and sugar on medium-high until pale and fluffy, roughly 2 minutes. Blend in the egg and vanilla. Lower the mixer speed and gradually incorporate the dry ingredients, mixing just until a uniform dough forms.
- Spread the finely chopped toasted pecans in a shallow dish. Portion the dough by rolling tablespoon-sized amounts into 1-inch balls. Roll each ball in the pecans, pressing gently so the nuts stick. Arrange the balls 2 inches apart on your prepared sheets.
- Use the back of a teaspoon to press a deep well into the center of each cookie. Fill each indentation with about ½ teaspoon of raspberry jam.
- Bake for approximately 10 minutes, or until set, swapping and turning the sheets halfway through. Let the cookies cool on the sheets for 5 minutes before moving them to a wire rack to cool fully.
- Once the cookies are completely cool, drizzle them with the melted white chocolate. Allow the chocolate to set and harden, about 15 minutes, before serving.
Notes
- Ensure the cookies are completely cool before drizzling with white chocolate to prevent it from melting and losing its shape.


Leave a Reply